
For my work (development) needs, but also for studying and experimenting, more and more computing power is required, not only from the CPU but also from the GPU.
I use virtual machines across various cloud providers AWS, Google Cloud, Azure, and DigitalOcean but I've also found OVHcloud to offer a compelling service at attractive prices.
These powerful machines, however, are not cheap. Leaving a high-performance instance running unattended, even just over a weekend, can lead to surprisingly high costs. This makes managing cloud resources effectively not just a matter of convenience, but a financial necessity.
What You'll Need (Prerequisites)
Before we dive in, let's make sure you have everything you need to follow along. This guide assumes you are familiar with the basics, but here’s a quick checklist:
-
An OVHcloud account with a Public Cloud project and a VM already created.
-
An AWS account. The free tier is more than sufficient for this project.
-
Docker Desktop installed and running on your computer. We'll use this to build our Lambda deployment package correctly.
-
Basic knowledge of Python and how to use the command line.
The Cloud Provider Cost Model
Each provider has its own price list and billing logic, but there are some common concepts:
-
Hourly cost of instances: you only pay when the VM is running (calculated per minute or per hour, depending on the provider).
-
Storage: the disk associated with an instance is often charged even when the instance is turned off.
-
Static IP addresses: if reserved (i.e., allocated), they continue to generate costs even when the instance is turned off.
-
Additional services: managed firewalls, load balancers, private networks, etc. are charged separately.
More powerful instances — especially those with GPUs — can cost tens of dollars per day if left on all the time.
For instances that we use for development, testing, experimentation, or demos, we can optimize spending by starting them only when necessary and stopping them as soon as they are no longer needed.
While shutting down an instance from the provider's web console is simple, I find it impractical for daily use.
AWS Lambda: our "control unit"
AWS Lambda is an AWS service that allows you to run code without having to manage a server.
You only pay for the time the code is running, which makes it perfect for short, occasional tasks such as starting or shutting down a VM.
In practice: you write the function that makes the API call to OVH, and AWS Lambda executes it when needed, without having to keep a server running 24/7.
API Gateway: the entry point
We need Amazon API Gateway to give our Lambda functions a public (or protected) HTTP/HTTPS address.
This way, we can start or shut down VMs simply by calling a URL — for example, via a browser, script, or mobile app — without having to manually connect to the OVH console.
API Gateway also manages authentication, traffic limits, and request logs, increasing security and control.
For example, I use AWS Lambda to create functions that can be called via API Gateway, so I can start or stop instances when I need them. We can even configure everything to automatically shut down an instance after a certain amount of time has elapsed since startup, or at a predefined time.
Today, we'll see how to control OVH Public Cloud instances via API using AWS Lambda and API Gateway.
While there are certainly more complex solutions, this method is simple, effective, and budget-friendly. Let's dive in and build it together.

Let's start with OVH:
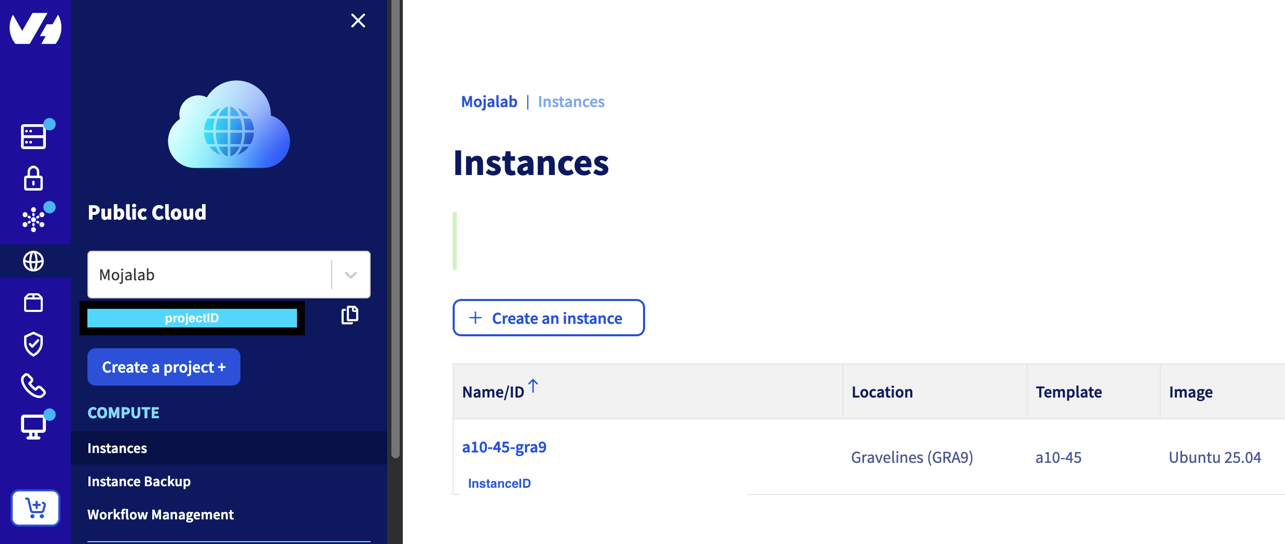
Prerequisite: To get started, you need to have an instance already created in the Public Cloud → Compute.
OVH uses OpenStack, an open-source cloud platform, to allow you to create and manage public or private clouds. OpenStack offers a range of services for running virtual machines, storing data, and managing networks, all of which can be controlled via a web dashboard or API.
In OVH's Public Cloud, OpenStack provides a flexible, on-demand infrastructure. You can launch instances, connect storage, configure networking, and scale resources without having to worry about the physical management of servers.
Gathering OpenStack Credentials from OVHcloud
To connect AWS Lambda to OVH's OpenStack APIs, we need authentication credentials.
You can obtain them from the OVH control panel by following these steps:
-
→ Go to Public Cloud → Compute → Instances.
-
Navigate to the instance you want to control and copy its Instance ID (UUID). We'll need this for our Lambda function's configuration later.
-
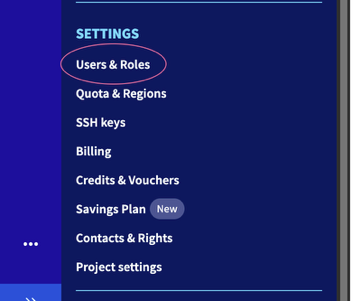
→ Return to the Public Cloud section and open Settings → Users & Roles.
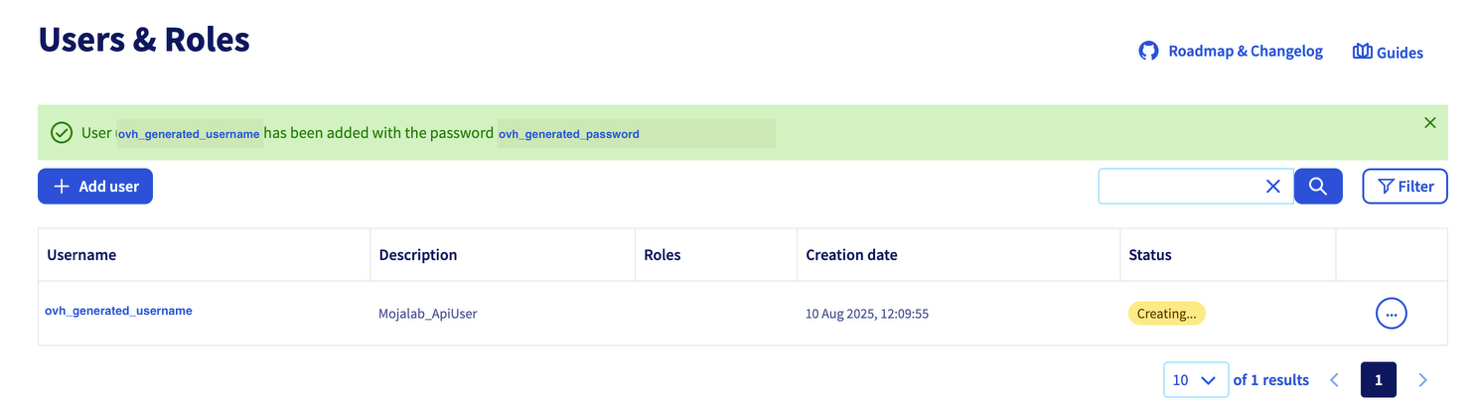
- Create a new OpenStack user (if you don't already have one dedicated to automation) and assign the roles: Compute Operator and Image Operator. Make a note of the username and password generated for the user. Without this role, the shelve operation will fail, potentially leaving the VM in a stuck or error state.
- After creating the user, download the openrc file from the "Download OpenStack RC file" section (when prompted, choose the region where the resource you want to control is located).
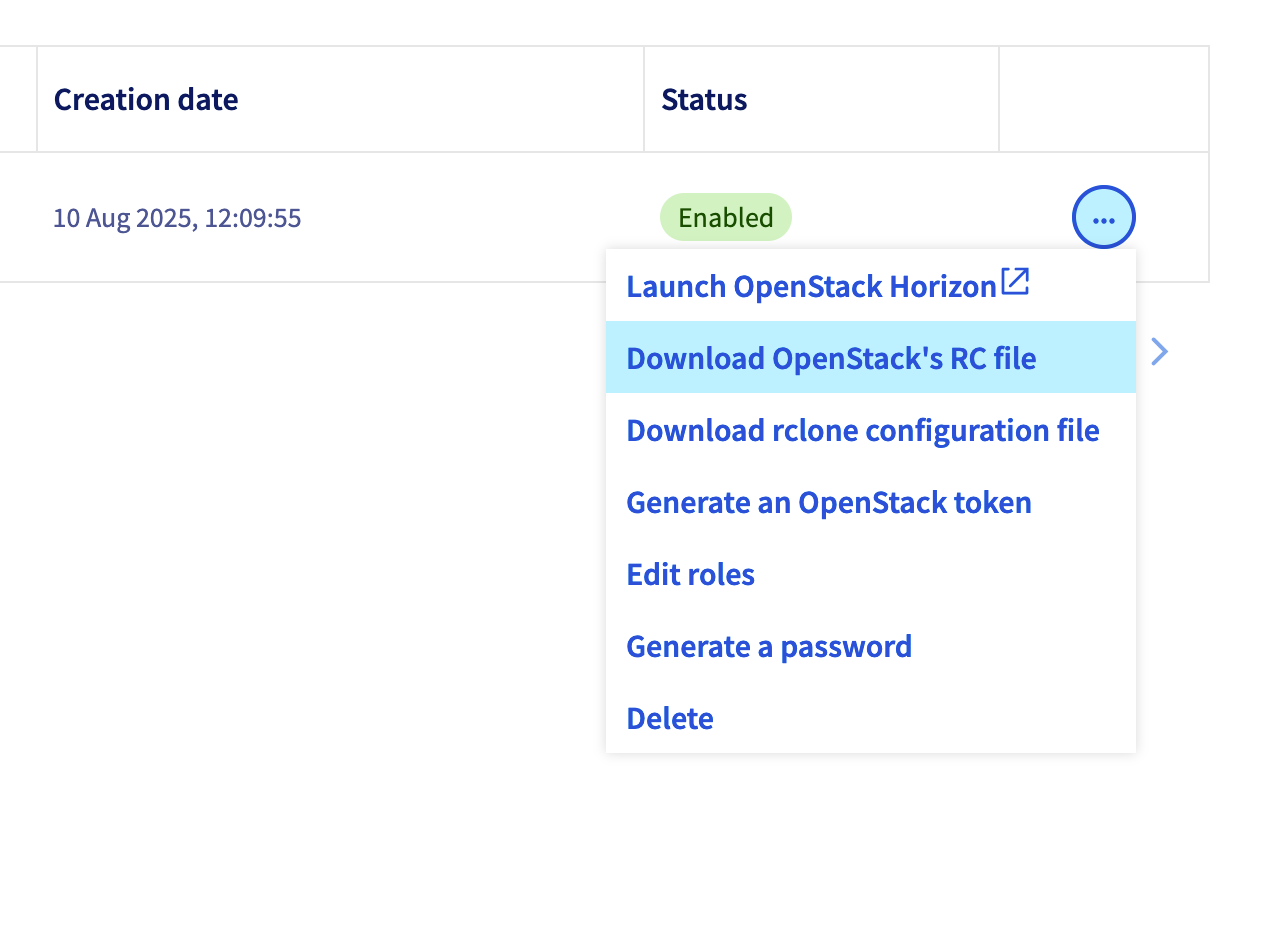
- Inside the file, you will find some values to use as environment variables in the Python function that we will write to manage our instance:
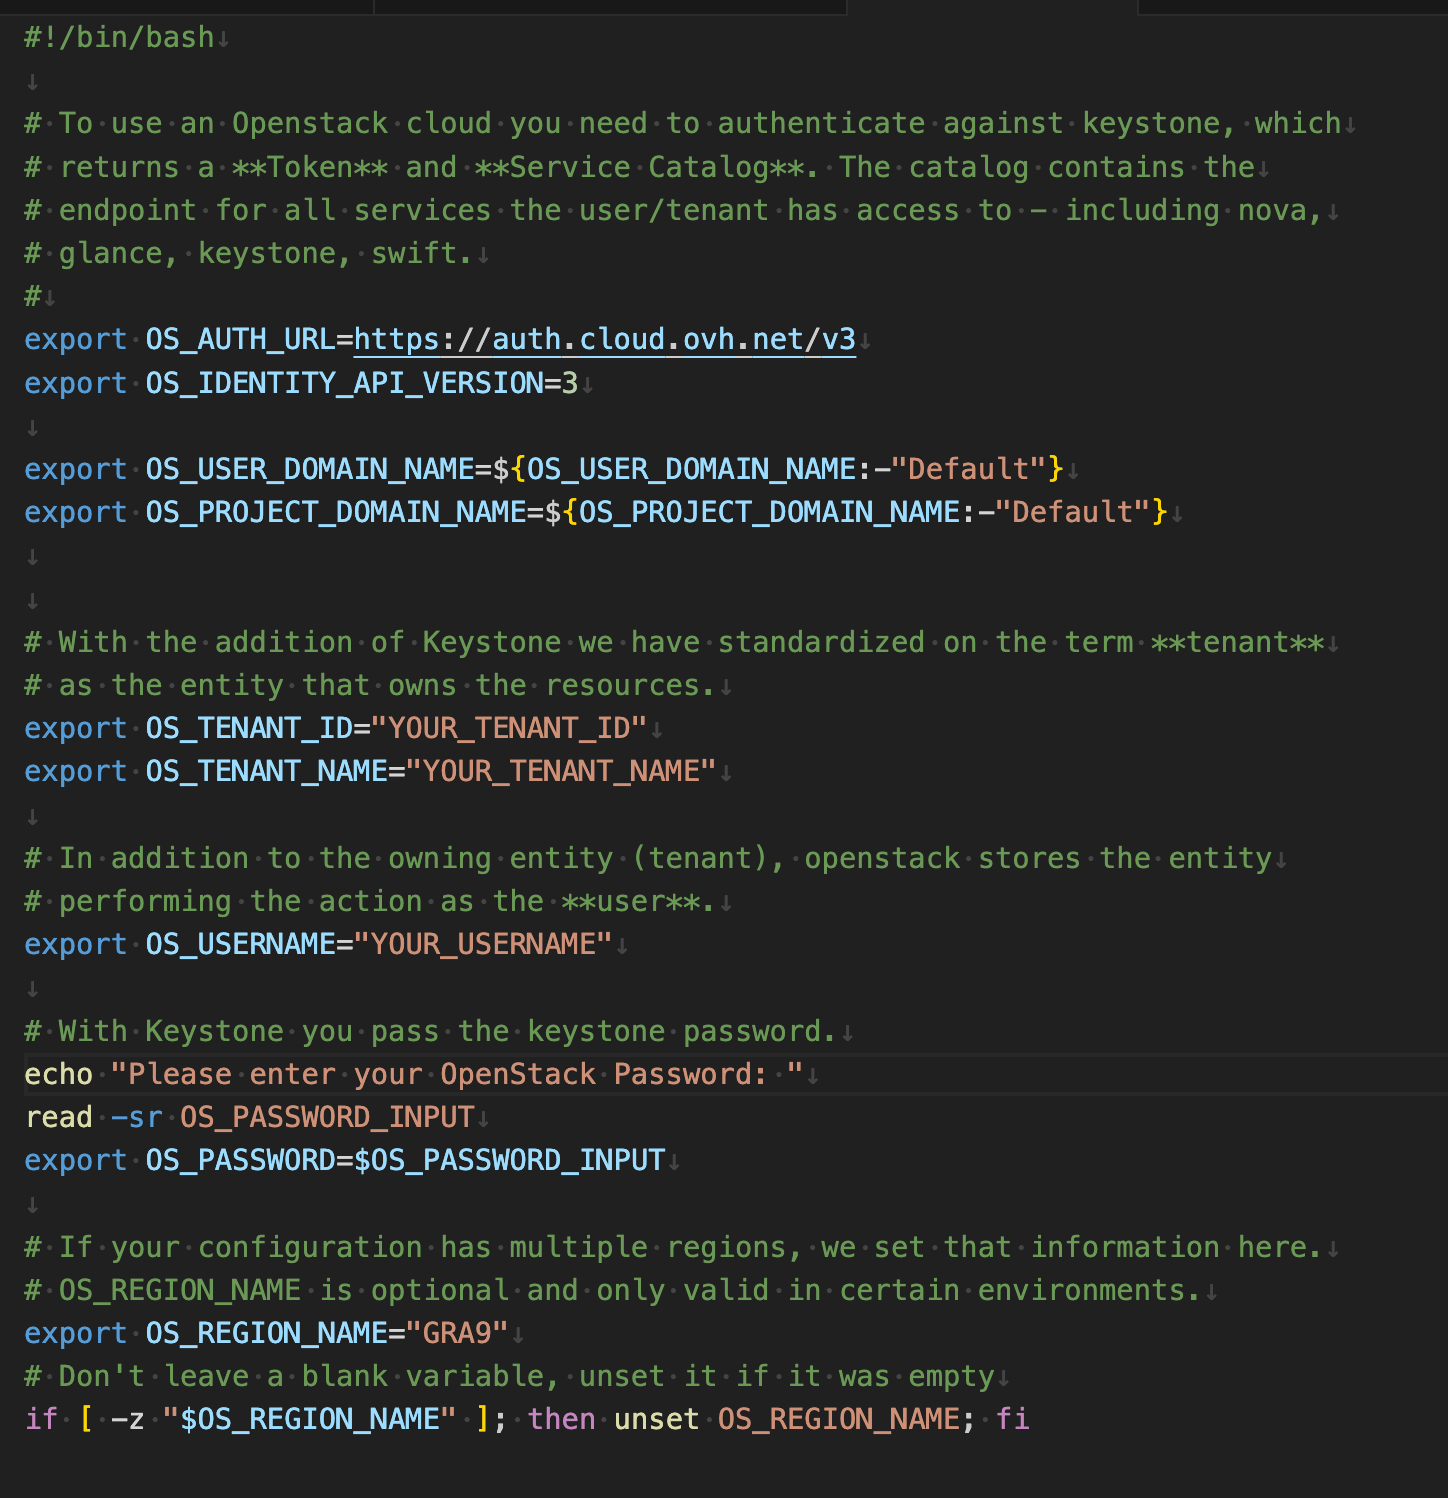
From the file, we retrieve this information:
-
OS_TENANT_NAME
-
OS_TENANT_ID
-
OS_USERNAME
-
OS_REGION_NAME
We will use these information, along with the password and instance ID, to configure our Lambda function.
Instance statuses and billing on OVH Public Cloud
In OpenStack, not all instance statuses have the same impact on costs.
Here is a useful map to help you decide which command to use for your purposes (saving money!):
| OpenStack status | Allocated resources | Instance billing | Notes |
|---|---|---|---|
| ACTIVE | CPU, RAM, disk | ✅ Yes | Instance is running and in use. |
| SHUTOFF (Stopped) | CPU, RAM, disk | ✅ Yes | Compute resources still reserved → paid as if it were turned on. |
| SHELVED | Only storage and IP | ❌ no (compute) | "Parked" instances, compute released. You only pay for reserved storage and IP. |
| SHELVED_OFFLOADED | Storage and IP only | ❌ no (compute) | A variant of shelve that can also be downloaded from hypervisor nodes. |
| ERROR | Variable | ❓ depends | Error status → must be analyzed on a case-by-case basis. |
Conclusion
If the goal is to stop computing costs, the instance must be set to SHELVED or SHELVED_OFFLOADED, not simply stopped.
Amazon AWS
Part 1: Create the function
Before diving into the AWS configuration, it is essential to prepare our code correctly.
First, we need to create the Python code that makes the API calls that OpenStack understands and that are necessary to manage our instance.
Please note that in this example, the instance ID is an environment variable, but with a simple modification it can become a parameter.
But a Lambda function is not just a Python file; it is a package that must also contain all the libraries it needs to run (the so-called dependencies).
This raises a common but crucial challenge: operating system compatibility.
-
Our computer (development): This could be a macOS (as in my case) or Windows.
-
The AWS Lambda environment ("production"): This is always a Linux environment (specifically, Amazon Linux).
If any of our libraries have parts written in a compiled language such as C (which is very common for high-performance libraries), the version we install on our Mac/Windows will be different from the one needed by Linux. Uploading a package created on macOS to Lambda would almost certainly lead to an import error (and it has happened to me).
How do we solve this problem reliably? With Docker!
Docker allows us to create and launch a small virtual Linux "container" on our computer. We will use this container as a "clean factory" to install the correct versions of the libraries for Linux. This way, the .zip package we create will be natively compatible with AWS Lambda, regardless of the operating system we use for development.
Part 2: Building the Deployment Package
Here you will find everything you need:
https://github.com/doradame/lambda_ovh
To automate the creation of our compatible package, we have organized the project with a few key files:
-
lambda_function.py: The core of our logic, the Python script that will be executed.
-
requirements.txt: A simple list of the necessary Python libraries (in our case, requests).
-
Dockerfile: An instruction file that tells Docker how to build the Linux environment and install our dependencies.
-
build_deps.sh (for Mac/Linux) and build_deps.bat (for Windows): Small scripts that automate the entire build process with a single command.
The process, orchestrated by the build script, is as follows:
-
Docker reads the Dockerfile and builds an image based on Amazon Linux.
-
Within this environment, pip installs the libraries from requirements.txt.
-
The libraries, now compiled for Linux, are extracted from the Docker container and copied to a local folder.
-
Our lambda_function.py is added to this folder.
-
Finally, all content is compressed into a single file, lambda_deployment.zip, ready to be uploaded.
By simply running ./build_deps.sh (or build_deps.bat on Windows) from the terminal, we get a fully functional deployment package.).
Part 3: Creating the "Remote Control" with AWS Lambda and API Gateway
Now that we have our Python code and the lambda_deployment.zip deployment package ready, it's time to build the heart of our remote control system on the Amazon Web Services (AWS) cloud. We will use two main services:
-
AWS Lambda, which will execute our code without the need for a server.
-
Amazon API Gateway, which will create a simple web link (an HTTP endpoint) to "call" our Lambda function.
The beauty of this architecture is that it's serverless: we don't have to manage any infrastructure, and the costs are negligible (often falling within the AWS Free Tier).
Let's look at the steps in detail.
Step 1: Creating the Lambda Function
First, let's create the "empty" container that will host our code.
-
Log in to the AWS Management Console and, in the search bar, type Lambda and select the service.
-
Click on the orange "Create function" button.
-
In the creation screen, select the **"**Author from scratch" option.
-
Fill in the "Basic information" section:
-
Function name: Choose a descriptive name, for example gestoreVmOvh.
-
Runtime: Select the version of Python you used for the project (e.g., Python 3.12).
-
Architecture: Leave the default setting x86_64.
-
-
Scroll down to the bottom and click "Create function."
After a few moments, you will be taken to the main dashboard for your new function.
Step 2: Uploading the Code
Now that the function exists, we need to upload our .zip package to it.
- In the function dashboard, locate the **"**Code source" box.
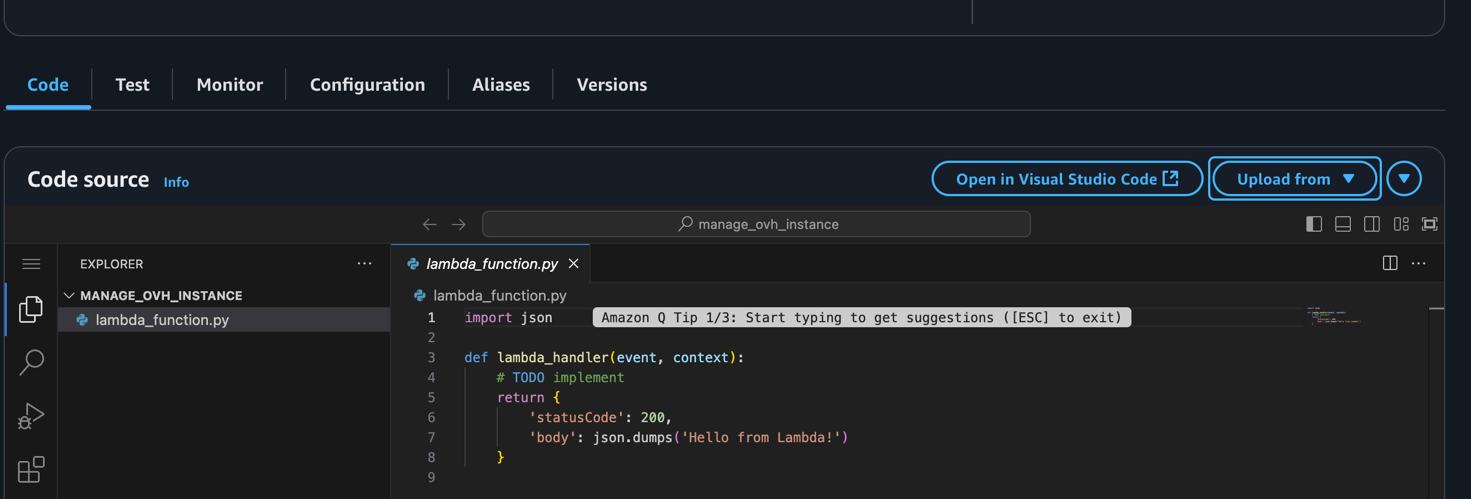
- Click on the **"**Upload from" button and select ".zip file" from the drop-down menu.
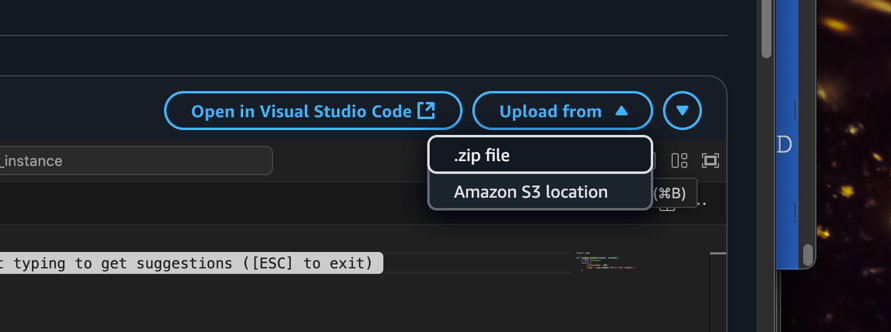
- A dialog box will open. Click "Upload," select the lambda_deployment.zip file you created earlier, and click **"**Save."
The system will take a few seconds to unzip and upload your code and its dependencies.
Step 3: Configuring Environment Variables
This is the most important step for security and functionality. Instead of writing our credentials directly into the code, we pass them to the function via secure environment variables.
-
Still in the function dashboard, click on the "Configuration" tab.
-
In the menu on the left, select "Environment variables."
-
Click on "Edit" and then on "Add environment variable" for each key that our script needs. Enter the following keys and their respective values that you obtained from OVHcloud:
-
Key: OS_AUTH_URL Value: https://auth.cloud.ovh.net/v3
-
Key: OS_USERNAME ; Value: The API username you created (e.g., user-xxxxxxxx)
-
Key: OS_PASSWORD Value: The password you generated for the API user.
-
Key: OS_PROJECT_ID Value: The ID of your Public Cloud project.
-
Key: OS_REGION_NAME Value: The region of your VM (e.g., GRA9).
-
Key: INSTANCE_ID Value: The specific ID of your virtual machine.
-
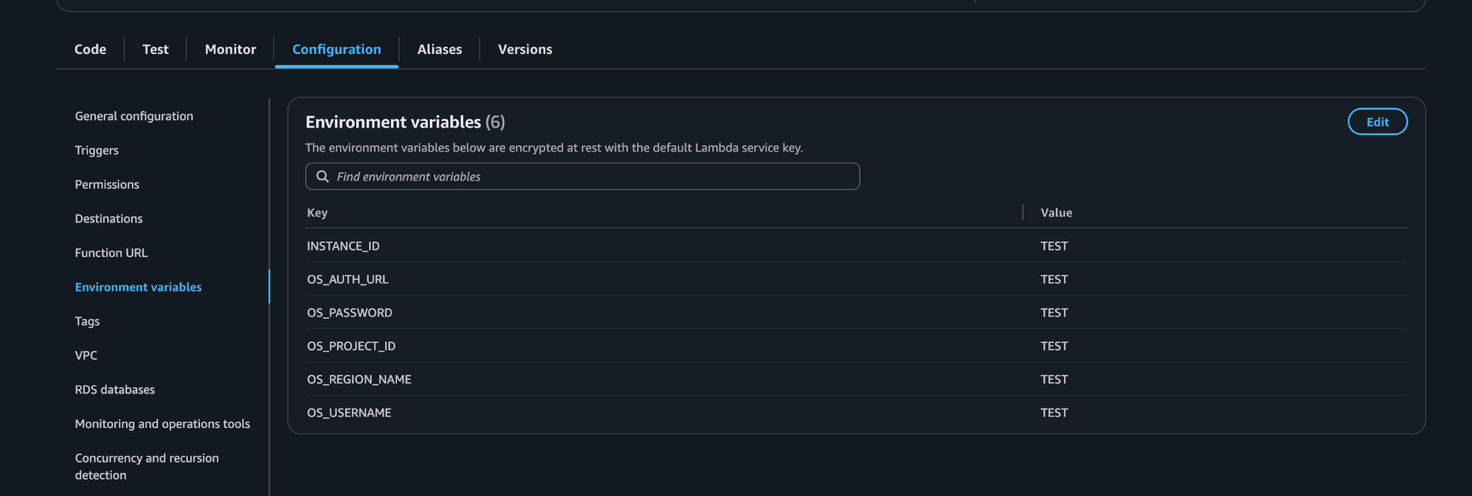
- Once you have entered all the variables, click "Save."
Step 4: Creating the Trigger with API Gateway
Now let's create the public web address to activate our function.
-
Return to the main view of the function by clicking on the "Code" tab.
-
In the diagram above, click on "+ " ( Add trigger).
-
On the next screen, select API Gateway from the drop-down menu.

-
Choose the "Create a new API**"** option.
-
Select the "REST API" type.
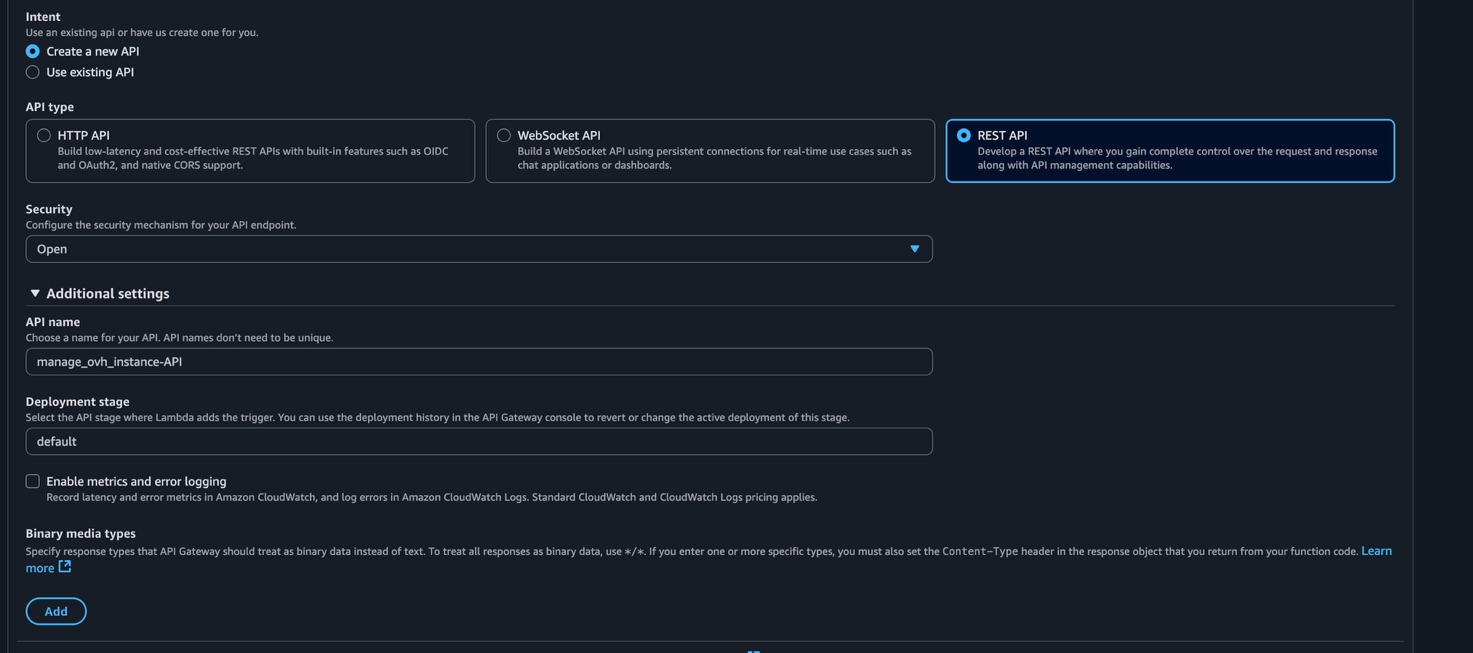
- In the "Security" field, choose "Open." This will make our link public and accessible without authentication. Click on "Add.". For simplicity, we've set the security to "Open". However, for any real-world use, you should secure this endpoint. A great next step would be to use an API Key, which is a straightforward method offered by API Gateway to prevent unauthorized access. This topic is extensive enough for its own article, but it's the essential next step to make this solution production-ready.
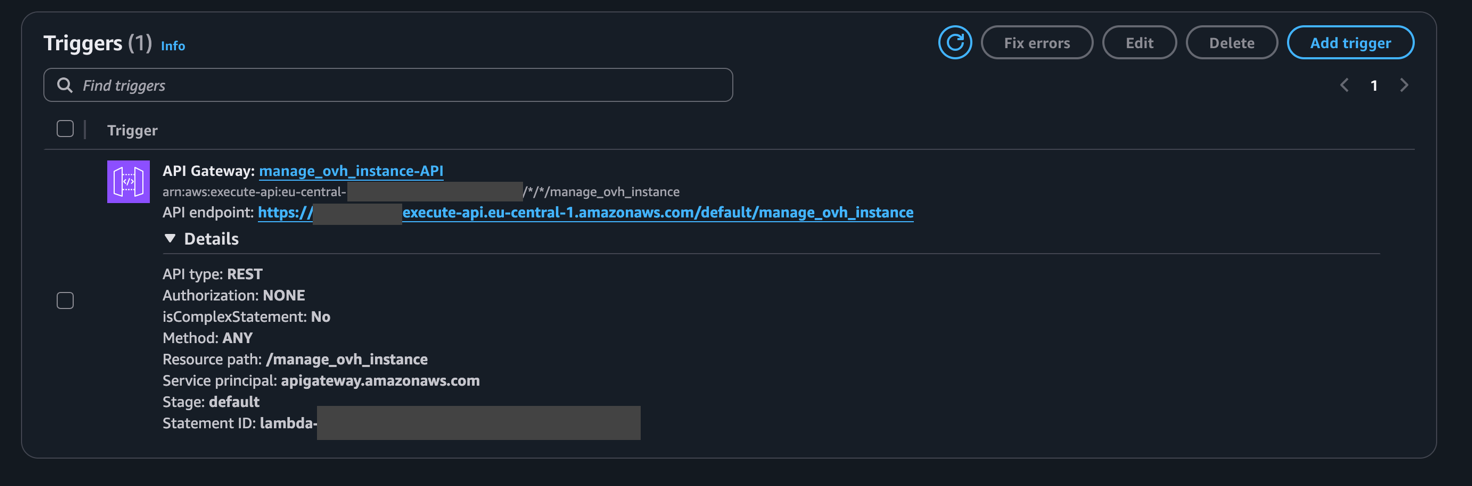
After a few moments, the trigger will be created. Returning to the function dashboard, in the "Triggers" section, you will see an "API Endpoint." This is the magic URL that we will use as a remote control!
Step 5: Final Test
Before using the link, let's do one last test from the console to make sure everything works.
-
In the function dashboard, click on the "Test" tab.
-
Select "Create a new event."
-
Event name: TestStatus.
-
In the Event JSON box, paste this code to simulate the status request:
{
"queryStringParameters": {
"action": "status"
}
}
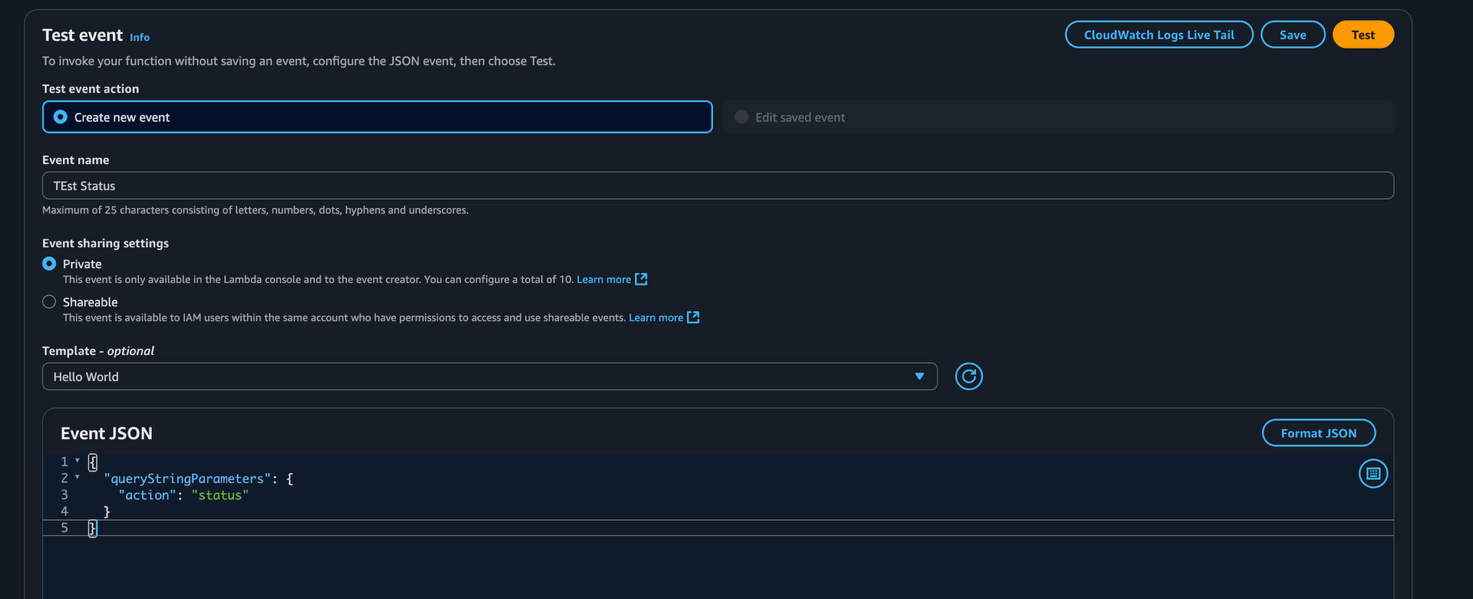
- Click on "Save" and then on the "Test" button.

If everything is configured correctly, you will see a green box with the status of your VM. You are now ready to go!
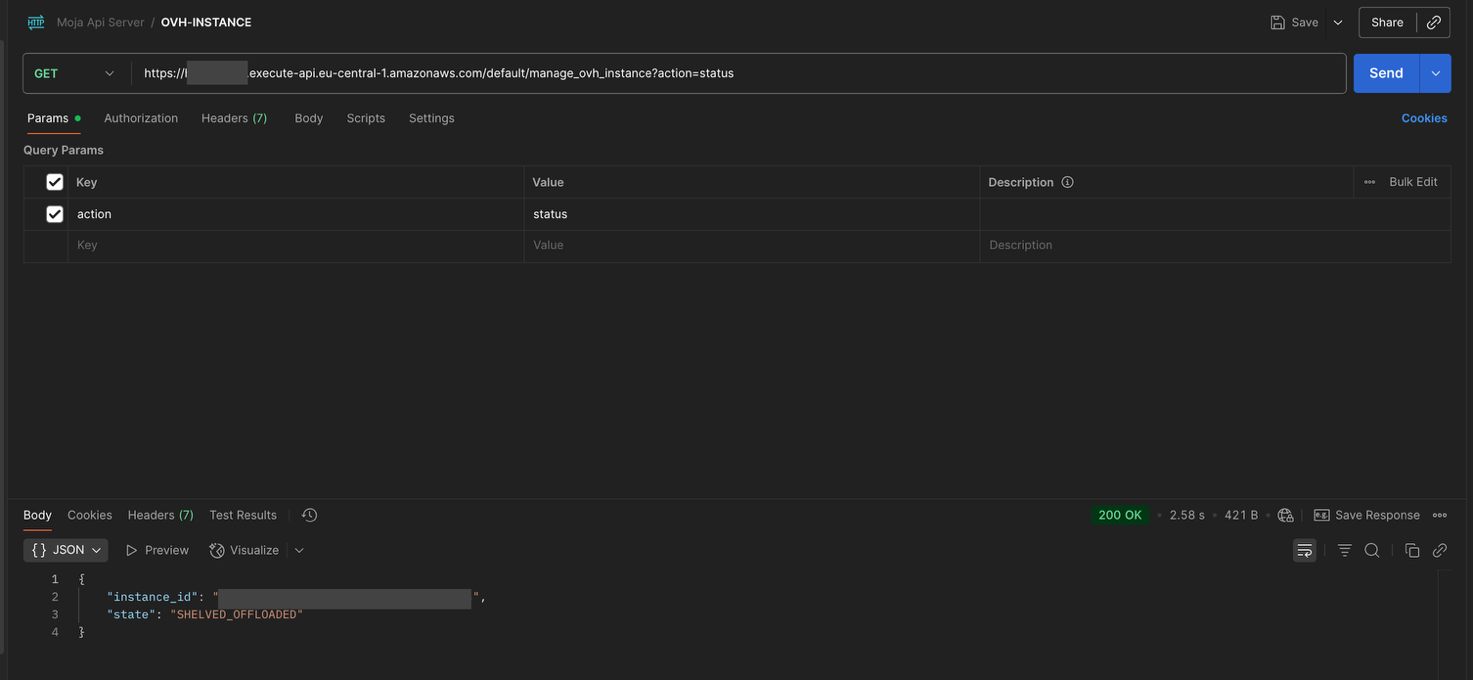
Appendix: Testing the API with Postman
If you prefer to test your new API in a more structured way, you can use a tool such as Postman.
Here's how to do it.
1. Find the Invoke URL
First, you need the full URL of your API.
-
Go to the API Gateway console on AWS.
-
In the left-hand menu, click on "Stages."
-
Click on the stage you created (usually called prod or default).
-
At the top, you will see the "Invoke URL." It will look something like https://xxxxxx.execute-api.us-east-1.amazonaws.com/prod. Copy it.
2. Build the Call in Postman
Now open Postman and follow these steps:
-
Create a New Request: Click on "+ " to open a new tab.
-
Set the Method: Make sure the HTTP method is set to GET.
-
Enter the URL: In the URL bar, paste the Invoke URL you just copied. If you used a REST API, you may need to add the name of the resource you defined (which by default may be the same as the Lambda function name, e.g., /gestoreVmOvh).
-
Add the Parameters:
-
Below the URL bar, go to the "Params" tab.
-
In the "Query Params" section, enter:
-
KEY: action
-
VALUE: status (or start, or stop)
-
-
As you type, you will see that Postman automatically adds ?action=status to the end of the URL for you.
-
Your final configuration in Postman should look like this:
Now click the blue "Send" button, and you should see the JSON response from your Lambda function in the bottom panel, confirming that your remote control is working perfectly!
Conclusions
A Final, Important Note on Security
In our guide, for simplicity, we have left the API Gateway endpoint "Open." In a production environment or if you want to prevent unauthorized use, it is essential to secure it. AWS API Gateway offers simple methods to do this, such as using API Keys. By creating an API Key, only requests that include this secret key will be accepted, effectively blocking access to anyone else. Configuring an API Key deserves a separate article, but it is the next essential step in making this solution robust and secure.
And there you have it! With some initial setup, we've built a powerful and virtually free serverless "remote control" for our cloud workstation.
Disclaimer: At MojaLab, we aim to provide accurate and useful content, but hey, we’re human (well, mostly)! If you spot an error, have questions, or think something could be improved, feel free to reach out—we’d love to hear from you. Use the tutorials and tips here with care, and always test in a safe environment. Happy learning!!!
No AI was mistreated in the making of this tutorial—every LLM was used with the respect it deserves.
Built with ❤️ by the MojaLab team.