Comprehensive Guide to Set Up a MariaDB Master-Slave Cluster Using Docker Compose on Debian
Introduction:
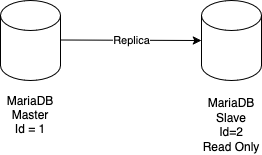
This detailed guide explores the process of implementing a MariaDB Master-Slave replication cluster utilizing Docker Compose within a Debian-based environment. The purpose of this guide is to provide insights into the replication mechanisms essential for scaling databases and ensuring fault tolerance. By focusing on the Master-Slave replication model, we aim to simplify the setup while laying the groundwork for understanding more advanced configurations such as Galera Cluster.

What is MariaDb
MariaDB is a popular open-source relational database management system (RDBMS) that was developed as a fork of MySQL. Designed to remain open and community-driven, MariaDB provides a highly reliable, scalable, and feature-rich database solution that is compatible with a wide range of applications. It supports SQL (Structured Query Language) for querying and managing data, making it a powerful tool for both small projects and enterprise-grade systems.
Key features of MariaDB include advanced replication capabilities (such as Master-Slave and Galera Cluster), robust security mechanisms, and compatibility with MySQL, which allows seamless migration and integration. MariaDB is widely used in web applications, data warehousing, and cloud solutions due to its performance optimization and extensive support for plugins and storage engines.
Prerequisites:
To successfully follow this guide, ensure you have:
- A Debian-based virtual machine with Docker and Docker Compose already installed.
- A basic understanding of database management systems and familiarity with Docker commands.
Step 1: Structuring the Directory
Begin by organizing the working directory to maintain clarity and ensure consistency throughout the setup process:
mkdir mariadb-cluster && cd mariadb-cluster
The resulting directory should be structured as follows:
.
|-- docker-compose.yml
|-- .env
|-- master
|   |-- Dockerfile
|   |-- my.cnf
|   `-- 1_master_create_replica_user.sql
|   `-- 3_master_create_and_populate_test_db.sql
|-- slave
|   |-- Dockerfile
|   |-- my.cnf
|   `-- 2_slave_connect_to_master.sql
|-- data
    |-- master
    `-- slave
You can use the following commands to create all the folders and the empty files that you need to fill with following the instruction reported below in the step 2
mkdir -p ./{master,slave,data/{master,slave}}
touch ./docker-compose.yml
touch ./.env
touch ./master/{Dockerfile,my.cnf,1_master_create_replica_user.sql,3_master_create_and_populate_test_db.sql}
touch ./slave/{Dockerfile,my.cnf,2_slave_connect_to_master.sql}
Step 2: Preparing Configuration Files and Initialization Scripts
In this step we are going to prepare all the configuration file that we need for our setup to work as expected, use your favorite text editor, i like using pico but use whatever you want.
-
Master Configuration (
master/my.cnf):
This will configure the master server to enable binary logging and assign a unique server ID:[mysqld] server-id=1 log-bin=mysql-bin log-basename=master -
Slave Configuration (
slave/my.cnf):
Set the slave server to read-only mode and assign it a unique server ID:[mysqld] server-id=2 read-only=1
Setting read-only=1 prevents unprivileged users from making updates on the slave, ensuring alignment with the master.
Note that users with special privileges, such as root, can still modify the slave even with this setting.
- Dockerfile:
We have to create a Dockerfile in both the slave and the master folder. The content is the same for both the mariadb servers:
FROM mariadb:latest

# Copy configuration file
COPY my.cnf /etc/mysql/conf.d/my.cnf

# Copy SQL script
COPY *.sql /sql_scripts/
-
Replica User Creation Script (
master/1_master_create_replica_user.sql):
This script establishes a user dedicated to replication and grants the necessary permissions:CREATE USER 'replica'@'%' IDENTIFIED BY 'replica_pass'; GRANT REPLICATION SLAVE ON *.* TO 'replica'@'%'; FLUSH PRIVILEGES; -
Test Database Creation Script (
master/3_master_create_and_populate_test_db.sql):
This script will create a test database with the name "exampledb" then with the USE command it select this database to be the object of the commands that will follow.
In the database we will create a new table with an id that will be our primary key, a data field and then a timestamp that has as default the current timestamp.
After the creation of the table the script will insert three test value.CREATE DATABASE exampledb IF NOT EXISTS; USE exampledb; CREATE TABLE test_table ( id INT AUTO_INCREMENT PRIMARY KEY, data VARCHAR(100), created_at TIMESTAMP DEFAULT CURRENT_TIMESTAMP ); INSERT INTO test_table (data) VALUES ('Replication Test 1'); INSERT INTO test_table (data) VALUES ('Replication Test 2'); INSERT INTO test_table (data) VALUES ('Replication Test 3'); -
Slave Connection Script (
slave/2_slave_connect_to_master.sql):
We will use this script to configure the slave’s connection to the master server:CHANGE MASTER TO MASTER_HOST='mariadb_master', MASTER_USER='replica', MASTER_PASSWORD='replica_pass', MASTER_LOG_FILE='<File>', MASTER_LOG_POS=<Position>; START SLAVE;Remember! We will Replace
<File>and<Position>with the values obtained from the master server’sSHOW MASTER STATUSoutput after the first start.
Step 3: Configuring Docker Compose
The docker-compose.yml file , in the main folder of our structure, defines the services, including their dependencies and configurations:
services:
  master:
    build: ./master
    container_name: mariadb_master
    volumes:
      - ./data/master:/var/lib/mysql
    environment:
      MARIADB_ROOT_PASSWORD: ${MASTER_ROOT_PASSWORD}
    ports:
      - "13306:3306"

  slave:
    build: ./slave
    container_name: mariadb_slave
    volumes:
      - ./data/slave:/var/lib/mysql
    environment:
      MARIADB_ROOT_PASSWORD: ${SLAVE_ROOT_PASSWORD}
    depends_on:
      - master
    ports:
      - "13307:3306"
Step 4: Setting Environment Variables
Sensitive information, such as passwords (except the one for the replica that, in this example, is in the sql script), are stored in the .env file located in the main folder:
MASTER_ROOT_PASSWORD=rootpass
SLAVE_ROOT_PASSWORD=slavepass
Step 5: Building and Launching the Cluster
To initialize and start the cluster, execute the following commands being in the same folder that contains the docker-compose.yaml file:
docker compose build
docker compose up -d
Confirm the containers are operational using:
docker ps
You should see something like this :
CONTAINER ID   IMAGE                   COMMAND                  CREATED          STATUS          PORTS                                           NAMES
2264200bed19   mariadbcluster-slave    "docker-entrypoint.s…"   27 minutes ago   Up 27 minutes   0.0.0.0:13307->3306/tcp, [::]:13307->3306/tcp   mariadb_slave
c2bdabe406c6   mariadbcluster-master   "docker-entrypoint.s…"   27 minutes ago   Up 27 minutes   0.0.0.0:13306->3306/tcp, [::]:13306->3306/tcp   mariadb_master
If you are not able to see running containers try to discover why with
docker logs mariadb_slave
or
docker logs mariadb_master
Step 6: Configuring Replication
-
Establish the Replica User on the Master:
We have to Run the script to create the replication user, first of all we have to obtain a shell on the master container:docker exec -it mariadb_master /bin/bashNow we can execute the script that will create the replica user and give to him all the needed privileges
mariadb -u root -p < /sql_scripts/1_master_create_replica_user.sqlWhen asked for the password use the one that you put in the .env file, in our example is rootpass because we are issuing this command in the master
-
Retrieve the Master Status:
After the execution of the sql script using the same shell we have to connect to mariadb and get the info needed to fill the sql script of the slave:mariadb -u root -pAnd then we will use:
SHOW MASTER STATUS;we will see something like:
+-------------------+----------+--------------+------------------+
| File              | Position | Binlog_Do_DB | Binlog_Ignore_DB |
+-------------------+----------+--------------+------------------+
| master-bin.000002 |      777 |              |                  |
+-------------------+----------+--------------+------------------+
1 row in set (0.002 sec)
MariaDB [(none)]> exit;
Bye
Take note of the File (master-bin.000002) and of the Position (777)
to exit the mariadb console you can use the command exit; the same command "exit" could be used to exit the shell that we are using on the container: -
Set Up the Slave:
Update theslave/2_slave_connect_to_master.sqlscript with the retrieved values File and Position and then restart the container to make the updated script available in the containerdocker compose down docker compose build docker compose up -dAlways check with docker ps, if everything is ok we can go on configuring the slave to connect to the master. First of all we need a shell to interact with the slave then we can execute the script 2:
docker exec -it mariadb_slave /bin/bash
mariadb -u root -p < /sql_scripts/2_slave_connect_to_master.sql
Remeber that the password is the one configured for the slave in the .env file, in our case is slavepass.
You can check the slave status like you did before on the master, using the same shell run:mariadb -u root -pAnd then we will use:
SHOW SLAVE STATUS \G;Note the \G at the end of the SHOW command, is used to show in a more readable way when you have a lot of fields and only one line.
If everything worked like expected we should see something like:MariaDB [(none)]> SHOW SLAVE STATUS\G *************************** 1. row *************************** Slave_IO_State: Waiting for master to send event Master_Host: mariadb_master Master_User: replica Master_Port: 3306 Connect_Retry: 60 Master_Log_File: master-bin.000003 Read_Master_Log_Pos: 343 Relay_Log_File: mysqld-relay-bin.000003 Relay_Log_Pos: 643 Relay_Master_Log_File: master-bin.000003 Slave_IO_Running: Yes Slave_SQL_Running: Yes Replicate_Do_DB: Replicate_Ignore_DB: Replicate_Do_Table: Replicate_Ignore_Table: Replicate_Wild_Do_Table: Replicate_Wild_Ignore_Table: Last_Errno: 0 Last_Error: Skip_Counter: 0 Exec_Master_Log_Pos: 343 Relay_Log_Space: 1253 Until_Condition: None Until_Log_File: Until_Log_Pos: 0 Master_SSL_Allowed: Yes Master_SSL_CA_File: Master_SSL_CA_Path: Master_SSL_Cert: Master_SSL_Cipher: Master_SSL_Key: Seconds_Behind_Master: 0 Master_SSL_Verify_Server_Cert: Yes Last_IO_Errno: 0 Last_IO_Error: Last_SQL_Errno: 0 Last_SQL_Error: Replicate_Ignore_Server_Ids: Master_Server_Id: 1 Master_SSL_Crl: Master_SSL_Crlpath: Using_Gtid: No Gtid_IO_Pos: Replicate_Do_Domain_Ids: Replicate_Ignore_Domain_Ids: Parallel_Mode: optimistic SQL_Delay: 0 SQL_Remaining_Delay: NULL Slave_SQL_Running_State: Slave has read all relay log; waiting for more updates Slave_DDL_Groups: 0 Slave_Non_Transactional_Groups: 0 Slave_Transactional_Groups: 0 Replicate_Rewrite_DB: 1 row in set (0.002 sec) MariaDB [(none)]> exit; Bye root@9375f0cb8ad6:/# exit exit ``` In this case we don't have any errors so we can do a check of the replication, exit the mariaDB console (exit;) and the shell (exit).
Step 7: Testing Replication
On the master server, we have to use the script to create the database and populate it, first of all we need a shell on the master:
docker exec -it mariadb_master /bin/bash
Now we can execute the script that will create the database
mariadb -u root -p < /sql_scripts/3_master_create_and_populate_test_db.sql
Exit from the shell with the commmand exit. Now we can verify that the data is replicated on the slave:
docker exec -i mariadb_slave mariadb -u root -p -e "SELECT * FROM exampledb.test_table;"
and after inserting the slave password, you should see something like:
id      data    created_at
1       Replication Test 1      2024-12-28 00:06:33
2       Replication Test 2      2024-12-28 00:06:33
3       Replication Test 3      2024-12-28 00:06:33
if you try on the master:
docker exec -i mariadb_master mariadb -u root -p -e "SELECT * FROM exampledb.test_table;"
after inserting the password you will see the same three lines:
id      data    created_at
1       Replication Test 1      2024-12-28 00:06:33
2       Replication Test 2      2024-12-28 00:06:33
3       Replication Test 3      2024-12-28 00:06:33
Step 8: Stopping and Cleaning Up the Cluster
To terminate the cluster and clean up resources, use:
docker-compose down
Conclusion:
This guide provides a comprehensive walkthrough for implementing MariaDB Master-Slave replication using Docker Compose that could be used for testing.
The purpose is to create something that will allow you to gain a basic, practical understanding of replication mechanisms.
Disclaimer: At MojaLab, we aim to provide accurate and useful content, but hey, we’re human (well, mostly)! If you spot an error, have questions, or think something could be improved, feel free to reach out—we’d love to hear from you. Use the tutorials and tips here with care, and always test in a safe environment. Happy learning!

