

Introduction
The release of the new open‑weight model GPT‑OSS sparked a lot of curiosity—including ours. What better way to explore its capabilities than to put it to the test on a dedicated server under our full control?
This guide was born from that idea: build a personal host for Large Language Models (LLMs) from scratch. For our experiment, we chose an OVH Public Cloud VM, specifically the A10‑45 flavor. With its specs, it's more than enough for hands‑on experimentation at an accessible cost of €0.76/hour.
The machine's characteristics in brief:
- GPU: NVIDIA A10
- RAM: 45 GB
- CPU: 30 vCores (3.3 GHz)
- Storage: 400 GB SSD
Technology Choice
For model serving we chose Ollama. Compared to alternatives like llama.cpp or vLLM, its simplicity lets you get up and running in minutes—so you can focus on something that's often overlooked: security and access management.
We decided to invest some time to add a sensible protection layer—a solid starting point. Two components play a key role here:
- LiteLLM: Think of it as a universal translator and a bouncer for your models. It's a proxy that makes any LLM (in our case, those exposed by Ollama) OpenAI‑API compatible. That's a big advantage by itself, but it's indispensable because it lets us manage access via API keys—decide who can use our models, and monitor usage.
- Nginx: Acts as the external shield (reverse proxy), handling inbound traffic and ensuring a secure, encrypted connection via HTTPS.
The final goal? Integrate this secure, powerful, self‑hosted LLM server straight into our daily development environment: Visual Studio Code, through the excellent Continue.dev extension.
💡 Pro Tip: Optimize Your Cloud Costs
Once your LLM server is configured, you don't necessarily have to keep it running 24/7. To avoid unnecessary costs, I've written a detailed guide on how to automate starting and stopping your VM.
Prerequisites
This guide assumes you already have:
Technical Skills
- Basic familiarity with the Linux command line: you should be comfortable with commands like
sudo,apt,systemctl, and editing text files (e.g., with nano or pico). - Familiarity with SSH to connect to and manage a remote server.
Accounts & Services
- An account with a cloud provider offering VMs with NVIDIA GPUs. This guide references OVH Public Cloud, but the steps are easily adaptable to AWS, Google Cloud, Azure, etc.
- A registered domain name: you’ll use it to configure a public hostname (e.g., my-llm.mydomain.com) and obtain a free SSL/TLS certificate from Let’s Encrypt.
- Access to your domain’s DNS management panel so you can create an A record pointing to your VM’s public IP.
Tools
- An SSH client installed on your computer. It’s built into modern OSes (Terminal on macOS/Linux, PowerShell or WSL on Windows).
1. Prepare the VM
Update packages and install the basics:
sudo apt update
sudo apt upgrade
sudo apt install -y python3 python3-pip git wget curl build-essential
2. Verify the NVIDIA GPU
Check that the GPU is visible:
lspci | grep -i nvidia
Example output (VM with an A10 GPU):
00:06.0 3D controller: NVIDIA Corporation GA102GL [A10] (rev a1)
3. Install the NVIDIA Drivers
sudo apt install ubuntu-drivers-common

# Detect recommended drivers for your GPU
ubuntu-drivers devices

# Automatically install the recommended drivers (recommended method)
sudo ubuntu-drivers autoinstall

# Alternatively, install a specific version if needed
# sudo apt install nvidia-utils-560 nvidia-driver-560
sudo reboot
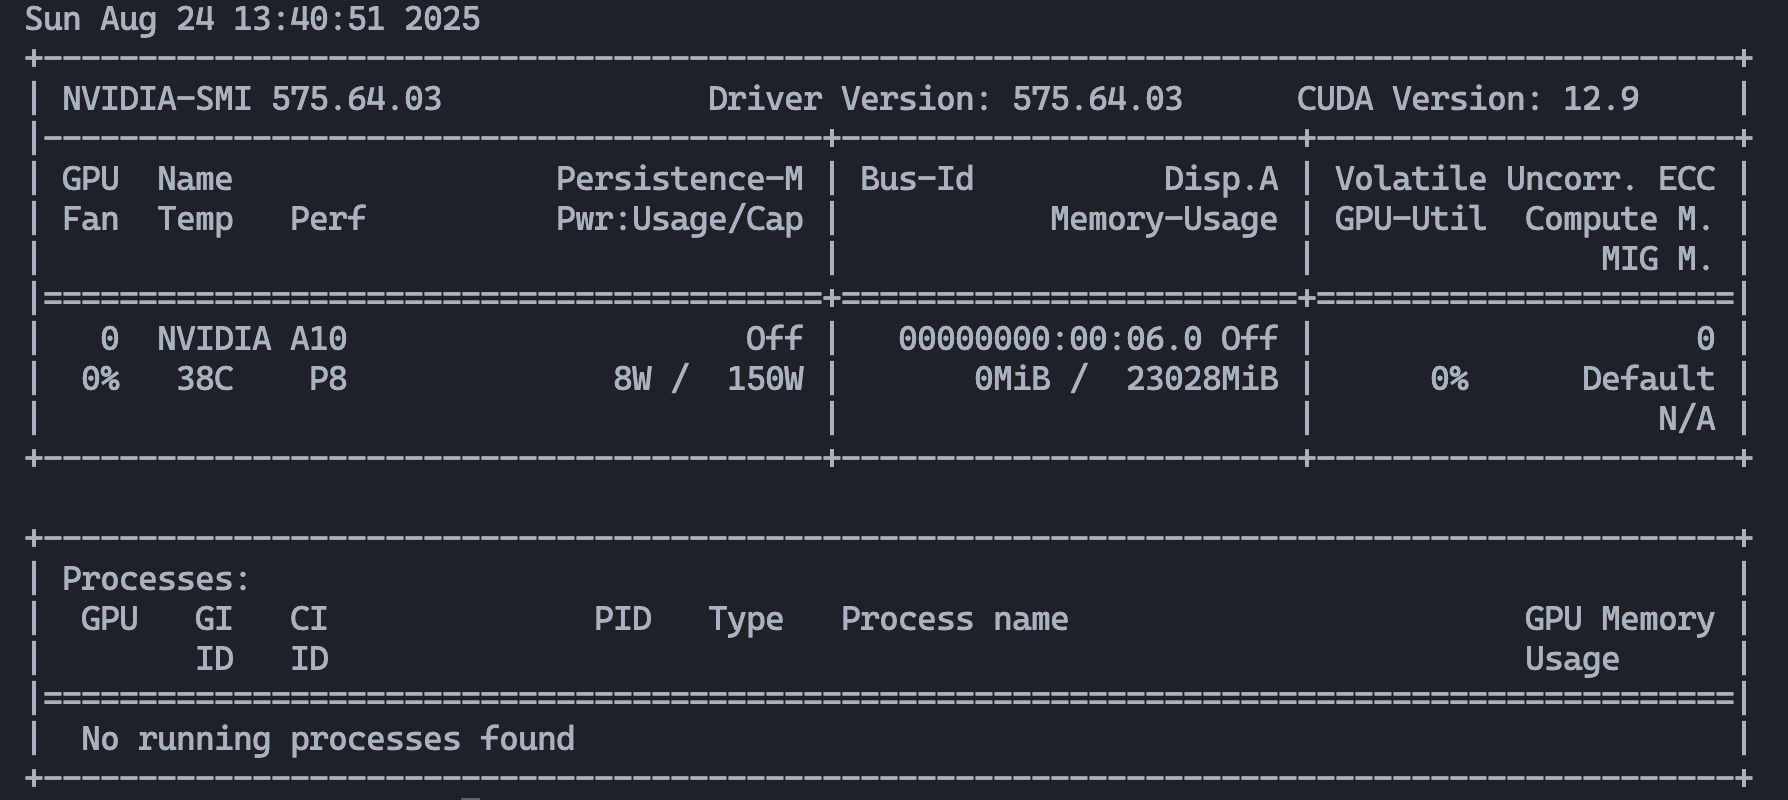
After reboot, verify with:
nvidia-smi
If you see your GPU, you’re good to go.
4. Install Ollama
Ollama is the engine that will serve the models:
curl -fsSL https://ollama.com/install.sh | OLLAMA_CUDNN=1 sh
ollama --version
Run it as a system service:
sudo systemctl start ollama
sudo systemctl enable ollama
5. Install Your First Models
List currently available models:
ollama list
It should return an empty list for now.
To begin, we want at least one general‑purpose chat model and one code‑specialized model. Here’s our pick:
gpt-oss:20b — The Powerful Generalist
- Who: Released by OpenAI, it’s their first model in the “GPT” family shipped with open weights since GPT‑2—an important step toward greater transparency and accessibility.
- What: A 20‑billion‑parameter model (with ~3.6B active per inference) based on a modern Mixture‑of‑Experts (MoE) architecture, making it very efficient and allowing it to run with relatively low VRAM (~16 GB).
- Why: Our all‑rounder—excellent at reasoning, text understanding, following complex instructions, and using “tools” (e.g., web search or running Python if you wire that up). Great for general chat, summaries, and text analysis.
qwen2.5-coder:1.5b — Fast & Lightweight Code Assistant
- Who: Part of the Qwen2.5 family from Alibaba Cloud’s research team, trained and optimized specifically for programming tasks.
- What: A much smaller model with “only” 1.5B parameters, which is its biggest strength—very fast and responsive.
- Why: Ideal for real‑time dev tasks: code autocompletion, small function generation, quick bug fixes, and snippet explanations. In short, a snappy pair‑programming buddy right in your editor.
Pull the models
ollama pull gpt-oss:20b
ollama pull qwen2.5-coder:1.5b
Listing again should show them:
NAME                  ID              SIZE     MODIFIED
gpt-oss:20b           aa4295ac10c3    13 GB    10 seconds ago
qwen2.5-coder:1.5b    bcc3e9f16cfe     2 GB     5 seconds ago
Quick test from the CLI:
ollama run gpt-oss:20b

6. Other Useful Models
Since our goal is to use Continue.dev to chat with our codebase, we need models that turn our LLM from a generic chatterbox into an assistant that actually “knows” our files. These are the backbone of Retrieval‑Augmented Generation (RAG).
What are Embedding Models?
Imagine organizing a huge library (your codebase) so that similar topics are easy to find. Instead of alphabetic order, you place books on a 3D shelf based on content—cookbooks in one corner, sci‑fi in another.
An embedding model does exactly that with text—but in a space of thousands of dimensions. It converts a piece of text (a function, a class, etc.) into a vector of numbers—an embedding.
The process works in two phases:
- Indexing: Continue.dev reads your code, splits it into chunks, and uses an embedding model (like
nomic-embed-text) to create a vector for each chunk. These vectors are stored in a special database. - Search: When you ask a question, the question is turned into a vector as well. The system searches for code vectors closest to your question’s vector.
Their role is to rapidly find potentially relevant documents.
# Embedding model to create numeric vectors from text
ollama pull nomic-embed-text
🎯 And Rerankers?
Similarity search is fast and effective—but not perfect. It might return ~20 “pretty relevant” results, but the very best one might not be first.
That’s where a reranker comes in. It’s a more “intelligent,” specialized model that doesn’t just look at vector distance; it takes your query and the candidate list and analyzes them deeper, asking: “Does this chunk actually answer this specific question?” It then reorders the list, promoting the truly most relevant results to the top—so the final context fed to the LLM is the highest quality possible.
# Model to reorder and improve relevance of search results
ollama pull dengcao/Qwen3-Reranker-8B:Q3_K_M
Together, embedder + reranker form a powerful combo that lets Continue.dev fetch precisely the right context from your project before the LLM generates an answer.
7. Get Let’s Encrypt Certificates (Certbot, webroot method)
- Install Certbot + the Nginx plugin:
sudo apt update
sudo apt install -y certbot python3-certbot-nginx
- Create the challenge path and set permissions:
sudo mkdir -p /var/www/letsencrypt/.well-known/acme-challenge
sudo chown -R www-data:www-data /var/www/letsencrypt
- Configure a minimal server to serve only ACME challenges (
/etc/nginx/sites-available/default):
server {
    listen 80 default_server;
    listen [::]:80 default_server;
    server_name _;
    root /var/www/html;
    index index.html;

    # allow only ACME challenges
    location ^~ /.well-known/acme-challenge/ {
        root /var/www/letsencrypt;
        default_type "text/plain";
    }

    location / { return 404; }
}
Reload:
sudo nginx -t
sudo systemctl reload nginx
- Request the certificate (replace the domain):
sudo certbot certonly --webroot -w /var/www/letsencrypt \
  -d ada-ia.moja-test.com --email you@example.com --agree-tos --no-eff-email
(Certs will be in /etc/letsencrypt/live/ada-ia.moja-test.com/.)
8. Configure Nginx
Create the needed folders:
sudo mkdir -p /var/log/nginx/ada-ia
sudo touch /var/log/nginx/ada-ia/access.log /var/log/nginx/ada-ia/error.log
sudo chown -R www-data:adm /var/log/nginx/ada-ia
In /etc/nginx/sites‑available/ there is—for now—only the default file used for ACME challenges on port 80.
We also need a specific file for the Ollama ↔ LiteLLM configuration.
ollama-litellm.conf
# /etc/nginx/sites-available/ollama-litellm.conf

# ---- Upstream LiteLLM (OpenAI-compatible) ----
upstream litellm_upstream {
    server 127.0.0.1:4000 max_fails=3 fail_timeout=10s;
    keepalive 32;
}

# ---- HTTP: ACME + redirect ----
server {
    listen 80;
    listen [::]:80;
    server_name ada-ia-temp.moja-test.com;

    # Webroot for Let's Encrypt challenges
    location ^~ /.well-known/acme-challenge/ {
        root /var/www/letsencrypt;
        default_type "text/plain";
    }

    # Everything else -> HTTPS
    location / {
        return 301 https://$host$request_uri;
    }

    access_log /var/log/nginx/ada-ia/access.log;
    error_log  /var/log/nginx/ada-ia/error.log;
}

# ---- HTTPS: reverse proxy to LiteLLM ----
server {
    listen 443 ssl;
    listen [::]:443 ssl;
    http2 on;
    server_name ada-ia-temp.moja-test.com;

    # LE certificates (already issued by certbot)
    ssl_certificate     /etc/letsencrypt/live/ada-ia-temp.moja-test.com/fullchain.pem;
    ssl_certificate_key /etc/letsencrypt/live/ada-ia-temp.moja-test.com/privkey.pem;
    include /etc/letsencrypt/options-ssl-nginx.conf;
    ssl_dhparam /etc/letsencrypt/ssl-dhparams.pem;

    # Security (enable HSTS after verifying everything)
    add_header Strict-Transport-Security "max-age=31536000; includeSubDomains" always;

    # (Optional) Security headers
    add_header X-Content-Type-Options nosniff always;
    add_header X-Frame-Options SAMEORIGIN always;
    add_header Referrer-Policy no-referrer-when-downgrade always;

    # Proxy to LiteLLM
    location / {
        proxy_pass http://litellm_upstream;
        proxy_http_version 1.1;

        # Forward headers
        proxy_set_header Host $host;
        proxy_set_header X-Real-IP $remote_addr;
        proxy_set_header X-Forwarded-Proto $scheme;
        proxy_set_header X-Forwarded-For $proxy_add_x_forwarded_for;
        proxy_set_header Connection '';
        # SSE / token-by-token streaming
        proxy_buffering off;
        proxy_read_timeout 3600;
        proxy_send_timeout 3600;

        # Avoid aggressive chunking on streams
        #chunked_transfer_encoding off;
    }

    client_max_body_size 32m;

    access_log /var/log/nginx/ada-ia/access.log;
    error_log  /var/log/nginx/ada-ia/error.log;
}
Create the two config files that Certbot would normally place for you (because we used certonly, we’ll create them manually):
sudo nano /etc/letsencrypt/options-ssl-nginx.conf
The file must contain:
# options-ssl-nginx.conf

ssl_session_cache shared:le_nginx_SSL:10m;
ssl_session_timeout 1440m;
ssl_session_tickets off;

ssl_protocols TLSv1.2 TLSv1.3;
ssl_prefer_server_ciphers off;

ssl_ciphers "ECDHE-ECDSA-AES128-GCM-SHA256:ECDHE-RSA-AES128-GCM-SHA256:ECDHE-ECDSA-AES256-GCM-SHA384:ECDHE-RSA-AES256-GCM-SHA384:ECDHE-ECDSA-CHACHA20-POLY1305:ECDHE-RSA-CHACHA20-POLY1305:DHE-RSA-AES128-GCM-SHA256:DHE-RSA-AES256-GCM-SHA384";
Now create ssl-dhparams.pem—used to harden key exchange:
Note: This can take a few minutes. That’s normal.
sudo openssl dhparam -out /etc/letsencrypt/ssl-dhparams.pem 2048
Enable the new site:
sudo ln -sf /etc/nginx/sites-available/ollama-litellm.conf /etc/nginx/sites-enabled/ollama-litellm.conf
sudo nginx -t
sudo systemctl reload nginx
9. Install LiteLLM (with PostgreSQL)
We’ll use PostgreSQL so LiteLLM can manage keys and usage metadata.
sudo apt update
sudo apt install -y postgresql
Create the database and user:
sudo -u postgres psql <<'SQL'
CREATE USER litellm WITH PASSWORD 'change-this-mojalab-password';
CREATE DATABASE litellm OWNER litellm;
GRANT ALL PRIVILEGES ON DATABASE litellm TO litellm;
SQL
Connection string we’ll use later:
postgresql://litellm:change-this-mojalab-password@127.0.0.1:5432/litellm
9.1 Install LiteLLM in a venv + apply schema
# === 1) SYSTEM PREP & DEPENDENCIES ===

# System packages:
# - python3-venv: create isolated Python environments
# - python3-pip: install Python packages
sudo apt install -y python3-venv python3-pip


# === 2) CREATE THE VIRTUAL ENVIRONMENT (VENV) ===

# Place it under /opt, a common location for third‑party software
sudo mkdir -p /opt/litellm-venv

# Hand over ownership to 'ubuntu' so you don't need sudo for every command
sudo chown ubuntu:ubuntu /opt/litellm-venv

# Create a clean venv
python3 -m venv /opt/litellm-venv


# === 3) INSTALL PYTHON PACKAGES INTO THE VENV ===

# Activate venv. From here, 'pip' and 'python' use this isolated env
source /opt/litellm-venv/bin/activate

# Upgrade pip
pip install --upgrade pip

# Ensure a clean state and get the correct LiteLLM version with needed extras
pip install litellm
python -m pip install --upgrade pip setuptools wheel
python -m pip uninstall -y litellm || true

# Final dependencies:
# - "litellm[proxy]": proxy mode
# - "prisma": DB toolkit for schema and client
# - "psycopg[binary]": PostgreSQL driver
python -m pip install "litellm[proxy]" prisma "psycopg[binary]"
# === 4) CONFIGURE LITELLM & THE DATABASE ===

sudo mkdir -p /etc/litellm

# Generate a secure master API key and save it in shell variable KEY
KEY="sk-$(openssl rand -hex 32)"

# Create the env file with DB URL and master key
printf "DATABASE_URL=postgresql://litellm:change-this-mojalab-password@127.0.0.1:5432/litellm
LITELLM_MASTER_KEY=%s
" "$KEY" | sudo tee /etc/litellm/litellm.env > /dev/null

# Secret file permissions
sudo chmod 600 /etc/litellm/litellm.env
# transfer ownership of litellm.env to user 'ubuntu'
sudo chown ubuntu:ubuntu /etc/litellm/litellm.env

# Copy Prisma schema to /etc/litellm (adjust python3.13 to your Python version if needed)
sudo cp /opt/litellm-venv/lib/python3.13/site-packages/litellm/proxy/schema.prisma /etc/litellm/schema.prisma

sudo chown ubuntu:ubuntu /etc/litellm/schema.prisma
sudo chmod 644 /etc/litellm/schema.prisma
# === 5) INITIALIZE THE DATABASE VIA PRISMA ===

# Load env vars for Prisma
set -a
. /etc/litellm/litellm.env
set +a

# Sanity check
env | grep -E '^(DATABASE_URL|LITELLM_MASTER_KEY)='

# Generate client and push schema
python -m prisma generate --schema /etc/litellm/schema.prisma
python -m prisma db push --schema /etc/litellm/schema.prisma
# === 6) SERVICE DIRECTORIES ===

sudo mkdir -p /var/lib/litellm /var/cache/litellm
sudo chown ubuntu:ubuntu /var/lib/litellm /var/cache/litellm
Create /etc/litellm/config.yaml:
# /etc/litellm/config.yaml
general_settings:
  database_url: postgresql://litellm:change-this-mojalab-password@127.0.0.1:5432/litellm
  enable_key_management: true

model_list:
  - model_name: gpt-oss-20b
    litellm_params:
      model: ollama/gpt-oss:20b
      api_base: http://127.0.0.1:11434

  - model_name: qwen2.5-coder-1.5b
    litellm_params:
      model: ollama/qwen2.5-coder:1.5b
      api_base: http://127.0.0.1:11434

  - model_name: qwen3-reranker-8b
    litellm_params:
      model: ollama/dengcao/Qwen3-Reranker-8B:Q3_K_M
      api_base: http://127.0.0.1:11434

  - model_name: nomic-embed-text
    litellm_params:
      model: ollama/nomic-embed-text:latest
      api_base: http://127.0.0.1:11434
Create the systemd service:
sudo pico /etc/systemd/system/litellm.service
Contents:
# /etc/systemd/system/litellm.service
[Unit]
Description=LiteLLM OpenAI-compatible proxy
After=network.target postgresql.service

[Service]
Type=simple
User=ubuntu
WorkingDirectory=/etc/litellm
EnvironmentFile=/etc/litellm/litellm.env
ExecStart=/opt/litellm-venv/bin/litellm --config /etc/litellm/config.yaml --port 4000 --host 127.0.0.1
Restart=always
RestartSec=3
Environment=HOME=/var/lib/litellm
Environment=XDG_CACHE_HOME=/var/cache/litellm
Environment=PRISMA_HIDE_UPDATE_MESSAGE=true

# Hardening baseline
NoNewPrivileges=true
ProtectSystem=full
PrivateTmp=true
LimitNOFILE=65536

[Install]
WantedBy=multi-user.target
Start it:
sudo systemctl daemon-reload
sudo systemctl enable litellm
sudo systemctl start litellm
sudo systemctl status litellm
If you change the configuration, here are quick restart commands:
sudo systemctl daemon-reload
sudo systemctl restart litellm
sudo systemctl status litellm
10. Create an API Key (LiteLLM)
set -a
. /etc/litellm/litellm.env
set +a

KEY_ALL=$(curl -s -X POST "http://127.0.0.1:4000/key/generate" \
  -H "Authorization: Bearer $LITELLM_MASTER_KEY" \
  -H "Content-Type: application/json" \
  -d '{"models":["*"],"metadata":{"alias":"moja-all"}}' | jq -r '.key // .token')
echo "KEY_ALL=$KEY_ALL"
Save the key—we’ll use it for tests. It will look like sk-uQlkTUQk4Mbkj-8FORzfVw. We’re storing it in $KEY_ALL so we don’t have to retype it during this console session.
11. API Tests (locally and via Nginx)
List models:
curl -s http://127.0.0.1:4000/v1/models \
  -H "Authorization: Bearer $KEY_ALL" | jq
Chat completion:
curl -s http://127.0.0.1:4000/v1/chat/completions \
  -H "Authorization: Bearer $KEY_ALL" \
  -H "Content-Type: application/json" \
  -d '{"model":"qwen2.5-coder-1.5b","messages":[{"role":"user","content":"Write a Python function that sums a list."}]}' | jq
Same test via the HTTPS reverse proxy:
curl -s https://ada-ia.moja-test.com/v1/chat/completions \
  -H "Authorization: Bearer $KEY_ALL" \
  -H "Content-Type: application/json" \
  -d '{
    "model": "qwen2.5-coder-1.5b",
    "messages": [{"role":"user","content":"Write a Python function that sums a list of numbers."}],
    "stream": false
  }' | jq
12. LiteLLM Web UI — Key Management & Dashboard
The UI lives on the same endpoints as the proxy:
https://ada-ia.moja-test.com/ui
Or:
https://ada-ia.moja-test.com/
- Access still requires a valid token; the master key is in
/etc/litellm/litellm.env.
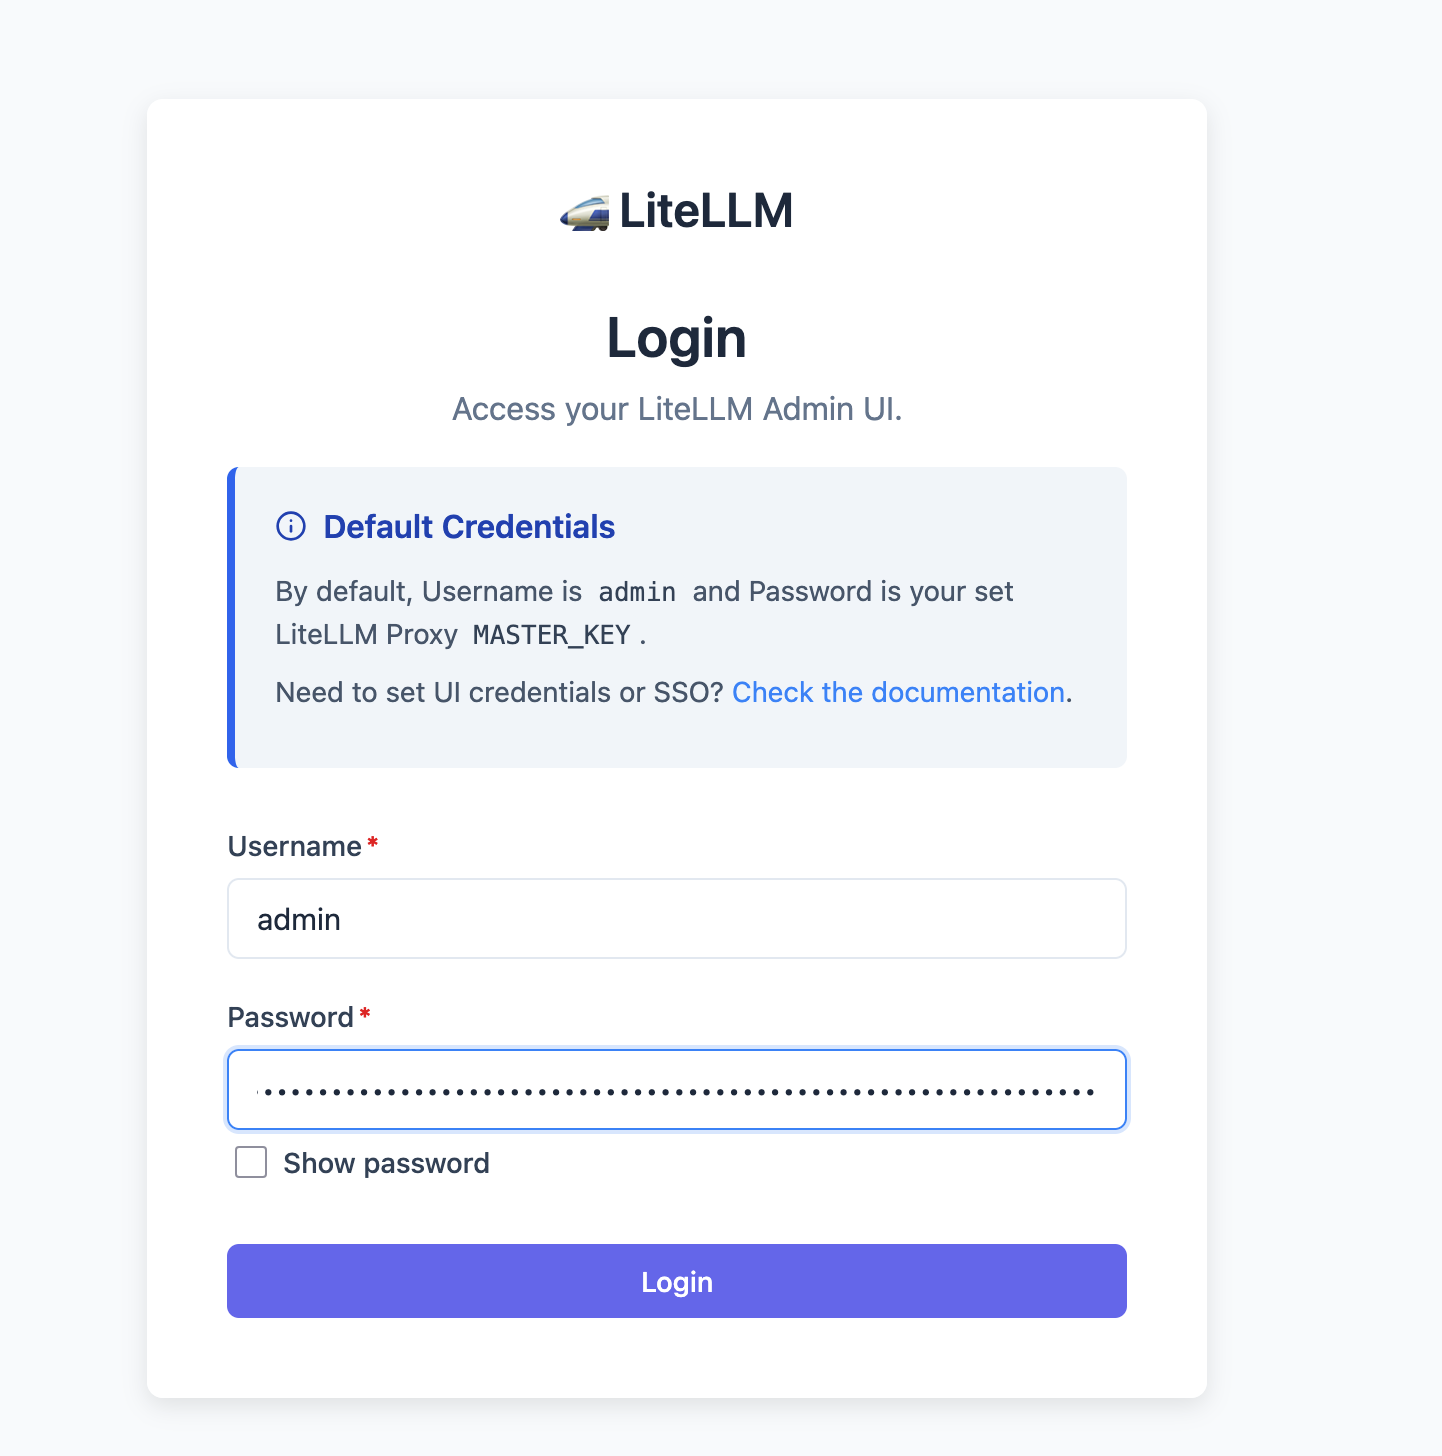
- Warning: For security, do not expose the UI to the open internet without filters (at minimum an IP allowlist / firewall).
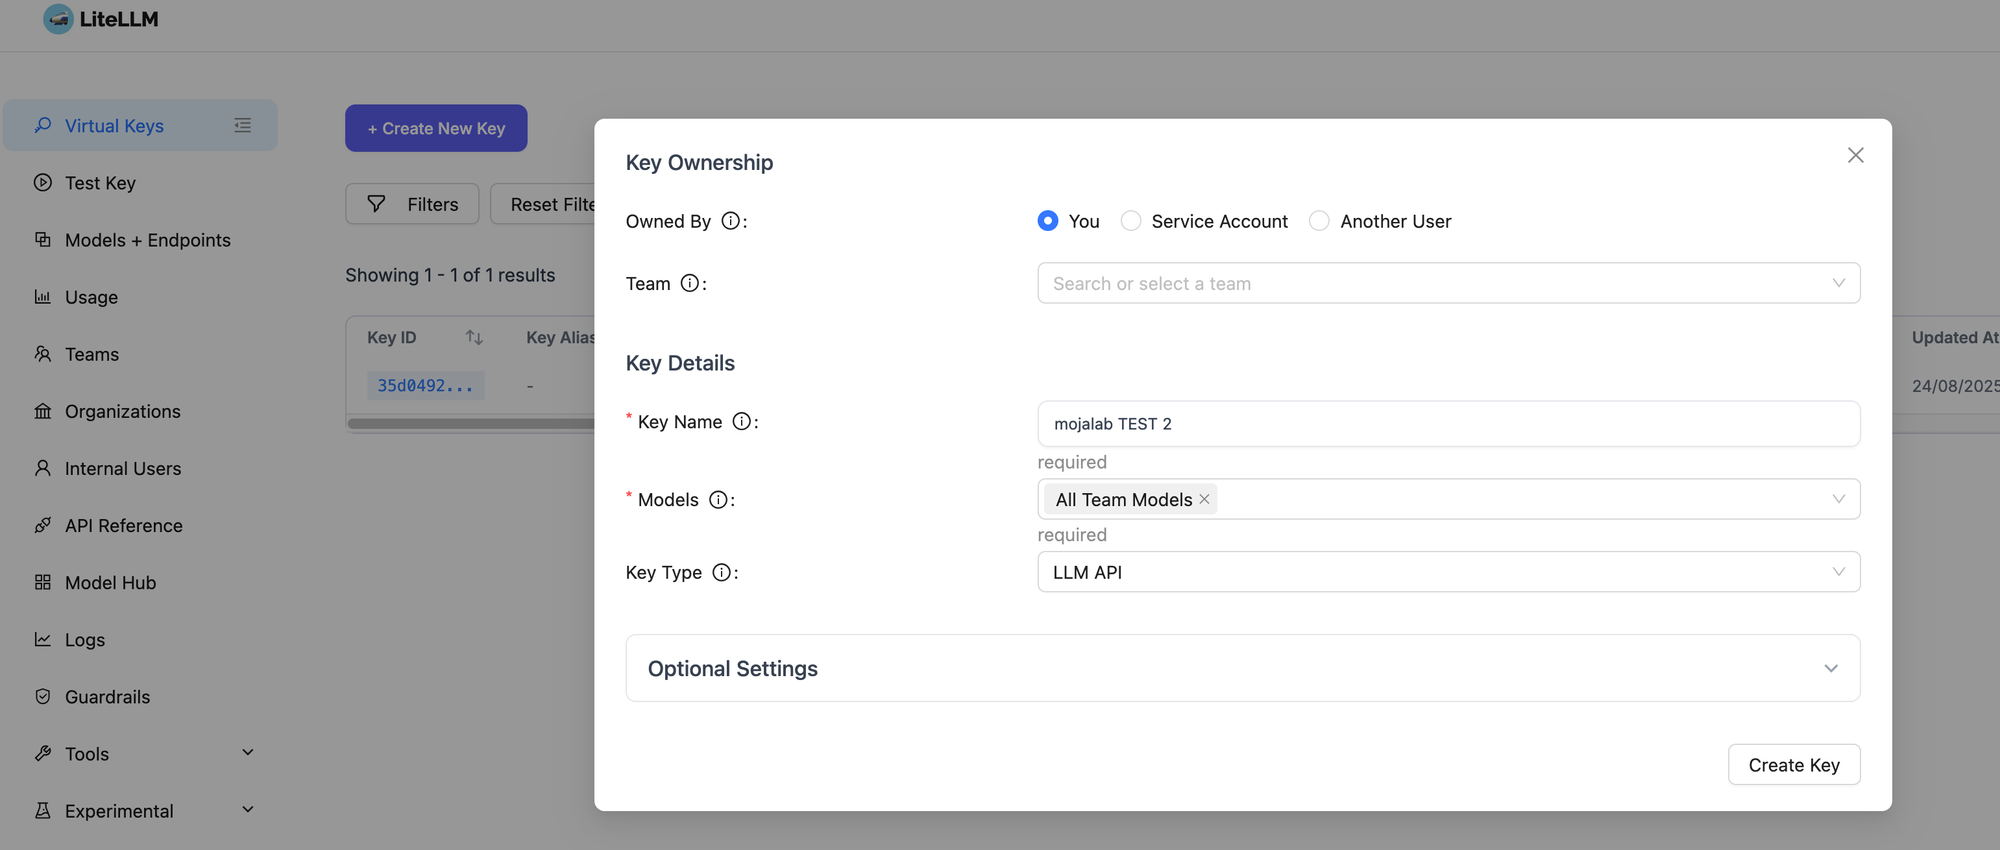
Creating a new key is straightforward: click Virtual Keys and set the options.
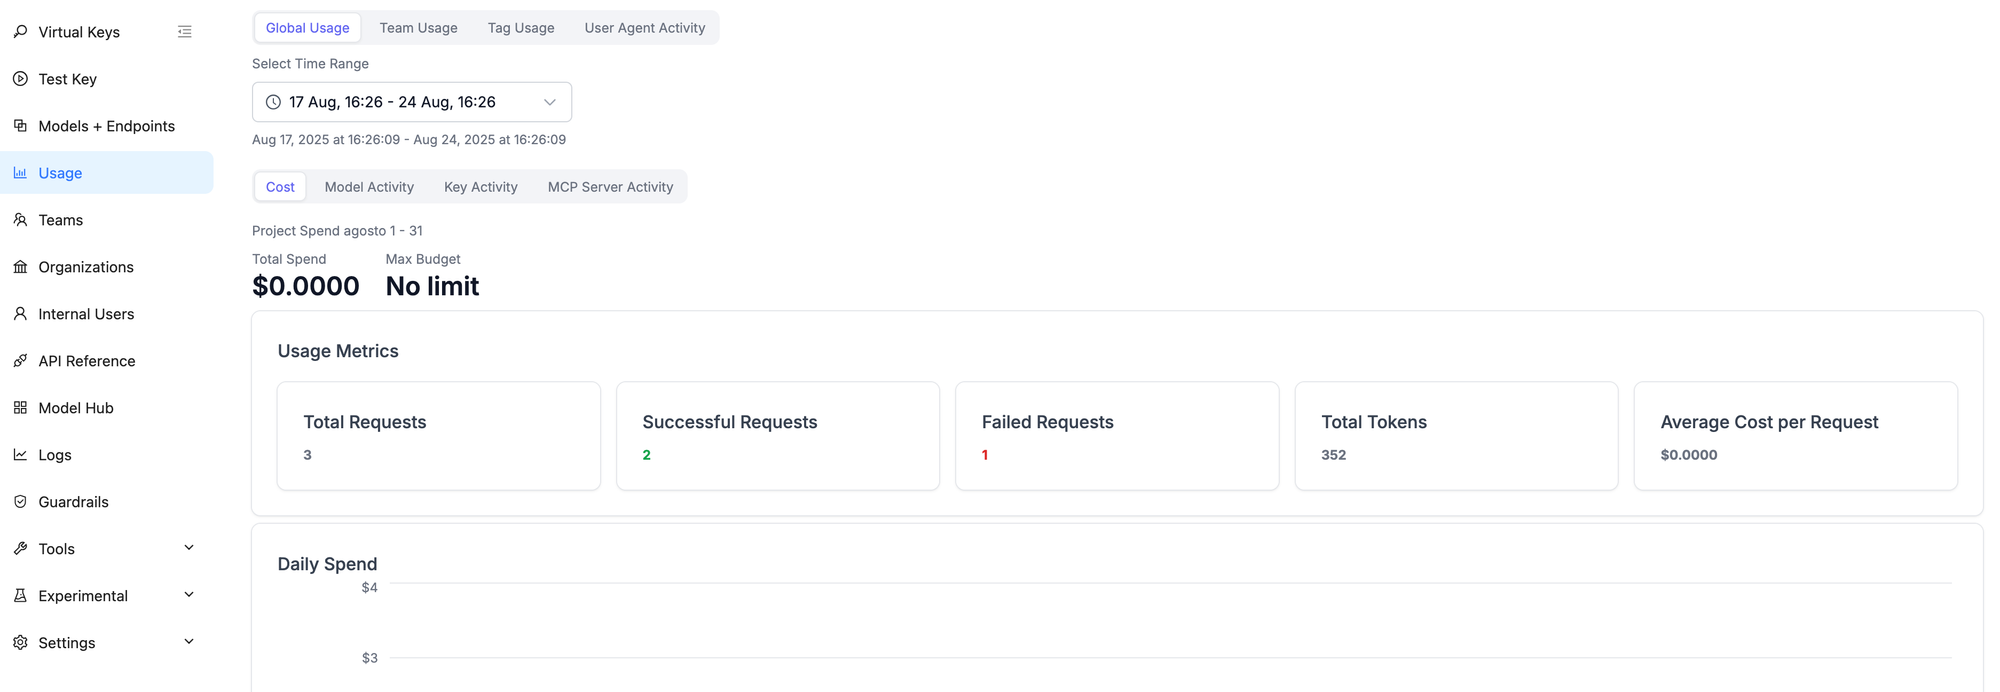
For usage analytics, click Usage to check actual model consumption.
13. LiteLLM — API Key Management (via API)
We saw how LiteLLM can manage keys and more via the web UI, but you can also do it programmatically. Here are a few examples (version 1.76.0).
1) Create a key
curl -s -X POST "http://127.0.0.1:4000/key/generate" \
  -H "Authorization: Bearer $LITELLM_MASTER_KEY" \
  -H "Content-Type: application/json" \
  -d '{
        "models": ["*"],
        "duration": "30d",
        "key_alias": "moja-all",
        "metadata": {"owner":"mojalab"}
      }' | jq
Main output fields: key (Bearer sk-…), token (internal ID), key_alias.
2) List keys
curl -s "http://127.0.0.1:4000/key/list" \
  -H "Authorization: Bearer $LITELLM_MASTER_KEY" | jq
With extended details:
curl -s "http://127.0.0.1:4000/key/list?return_full_object=true" \
  -H "Authorization: Bearer $LITELLM_MASTER_KEY" | jq '.keys[] | {key_name, key_alias, spend, max_budget, expires}'
3) Key info
curl -s -G "http://127.0.0.1:4000/key/info" \
  --data-urlencode "key=sk-...your_key..." \
  -H "Authorization: Bearer $LITELLM_MASTER_KEY" | jq
4) Update a key
curl -s -X POST "http://127.0.0.1:4000/key/update" \
  -H "Authorization: Bearer $LITELLM_MASTER_KEY" \
  -H "Content-Type: application/json" \
  -d '{
        "key": "sk-...",
        "key_alias": "moja-renamed",
        "models": ["qwen2.5-coder-1.5b","gpt-oss-20b"],
        "duration": "60d",
        "max_budget": 100.0,
        "metadata": {"note":"extended"}
      }' | jq
5) Block / Unblock
# block
curl -s -X POST "http://127.0.0.1:4000/key/block" \
  -H "Authorization: Bearer $LITELLM_MASTER_KEY" \
  -H "Content-Type: application/json" \
  -d '{"key":"sk-..."}' | jq

# unblock
curl -s -X POST "http://127.0.0.1:4000/key/unblock" \
  -H "Authorization: Bearer $LITELLM_MASTER_KEY" \
  -H "Content-Type: application/json" \
  -d '{"key":"sk-..."}' | jq
6) Regenerate
# path param
curl -s -X POST "http://127.0.0.1:4000/key/sk-.../regenerate" \
  -H "Authorization: Bearer $LITELLM_MASTER_KEY" | jq

# request body
curl -s -X POST "http://127.0.0.1:4000/key/regenerate" \
  -H "Authorization: Bearer $LITELLM_MASTER_KEY" \
  -H "Content-Type: application/json" \
  -d '{"key":"sk-..."}' | jq
7) Delete
curl -s -X POST "http://127.0.0.1:4000/key/delete" \
  -H "Authorization: Bearer $LITELLM_MASTER_KEY" \
  -H "Content-Type: application/json" \
  -d '{"key":"sk-..."}' | jq
14. Final Hardening: Firewall (UFW)
Now that we’ve verified the full architecture (Ollama → LiteLLM → Nginx) works, let’s complete the setup by enabling a firewall. This is critical for security: we’ll expose only Nginx to the internet and block direct external access to PostgreSQL (5432), Ollama (11434), and LiteLLM (4000).
We’ll use ufw (Uncomplicated Firewall), Ubuntu’s standard firewall tool.
# 1) Allow SSH (CRITICAL so you don’t lock yourself out!)
sudo ufw allow OpenSSH

# 2) Allow web traffic for Nginx (opens 80 for HTTP and 443 for HTTPS)
sudo ufw allow 'Nginx Full'

# 3) Enable the firewall (you’ll be asked to confirm)
sudo ufw enable

# 4) Check status
sudo ufw status
ufw status should show that OpenSSH and Nginx Full are allowed from anywhere. With these simple rules, your VM is protected. All traffic not explicitly allowed—including our internal service ports—will be blocked from the outside, while internal communication on the server still works.
Important Note for Advanced Users
The
ufwcommands below assume a clean VM without a pre‑existing firewall.If you already manage firewall rules at a higher level (e.g., the cloud provider’s Network Firewall or AWS Security Groups) or prefer managing rules manually with
iptables, you can skip this section to avoid conflicts.Regardless of the tool, we strongly recommend restricting inbound access to port 443 (HTTPS) to your own IP or a small allowlist of trusted IPs. This is the safest way to ensure only you can reach LiteLLM’s management UI and APIs from the public internet.
🤓 A Friendly Security Tip...
Awesome, your server is online! Before you call it a day, it’s a smart move to add a basic layer of security. Now that it’s visible on the internet, it will attract automated bots (that's just how it works). Here's a super effective and easy way to keep them out.
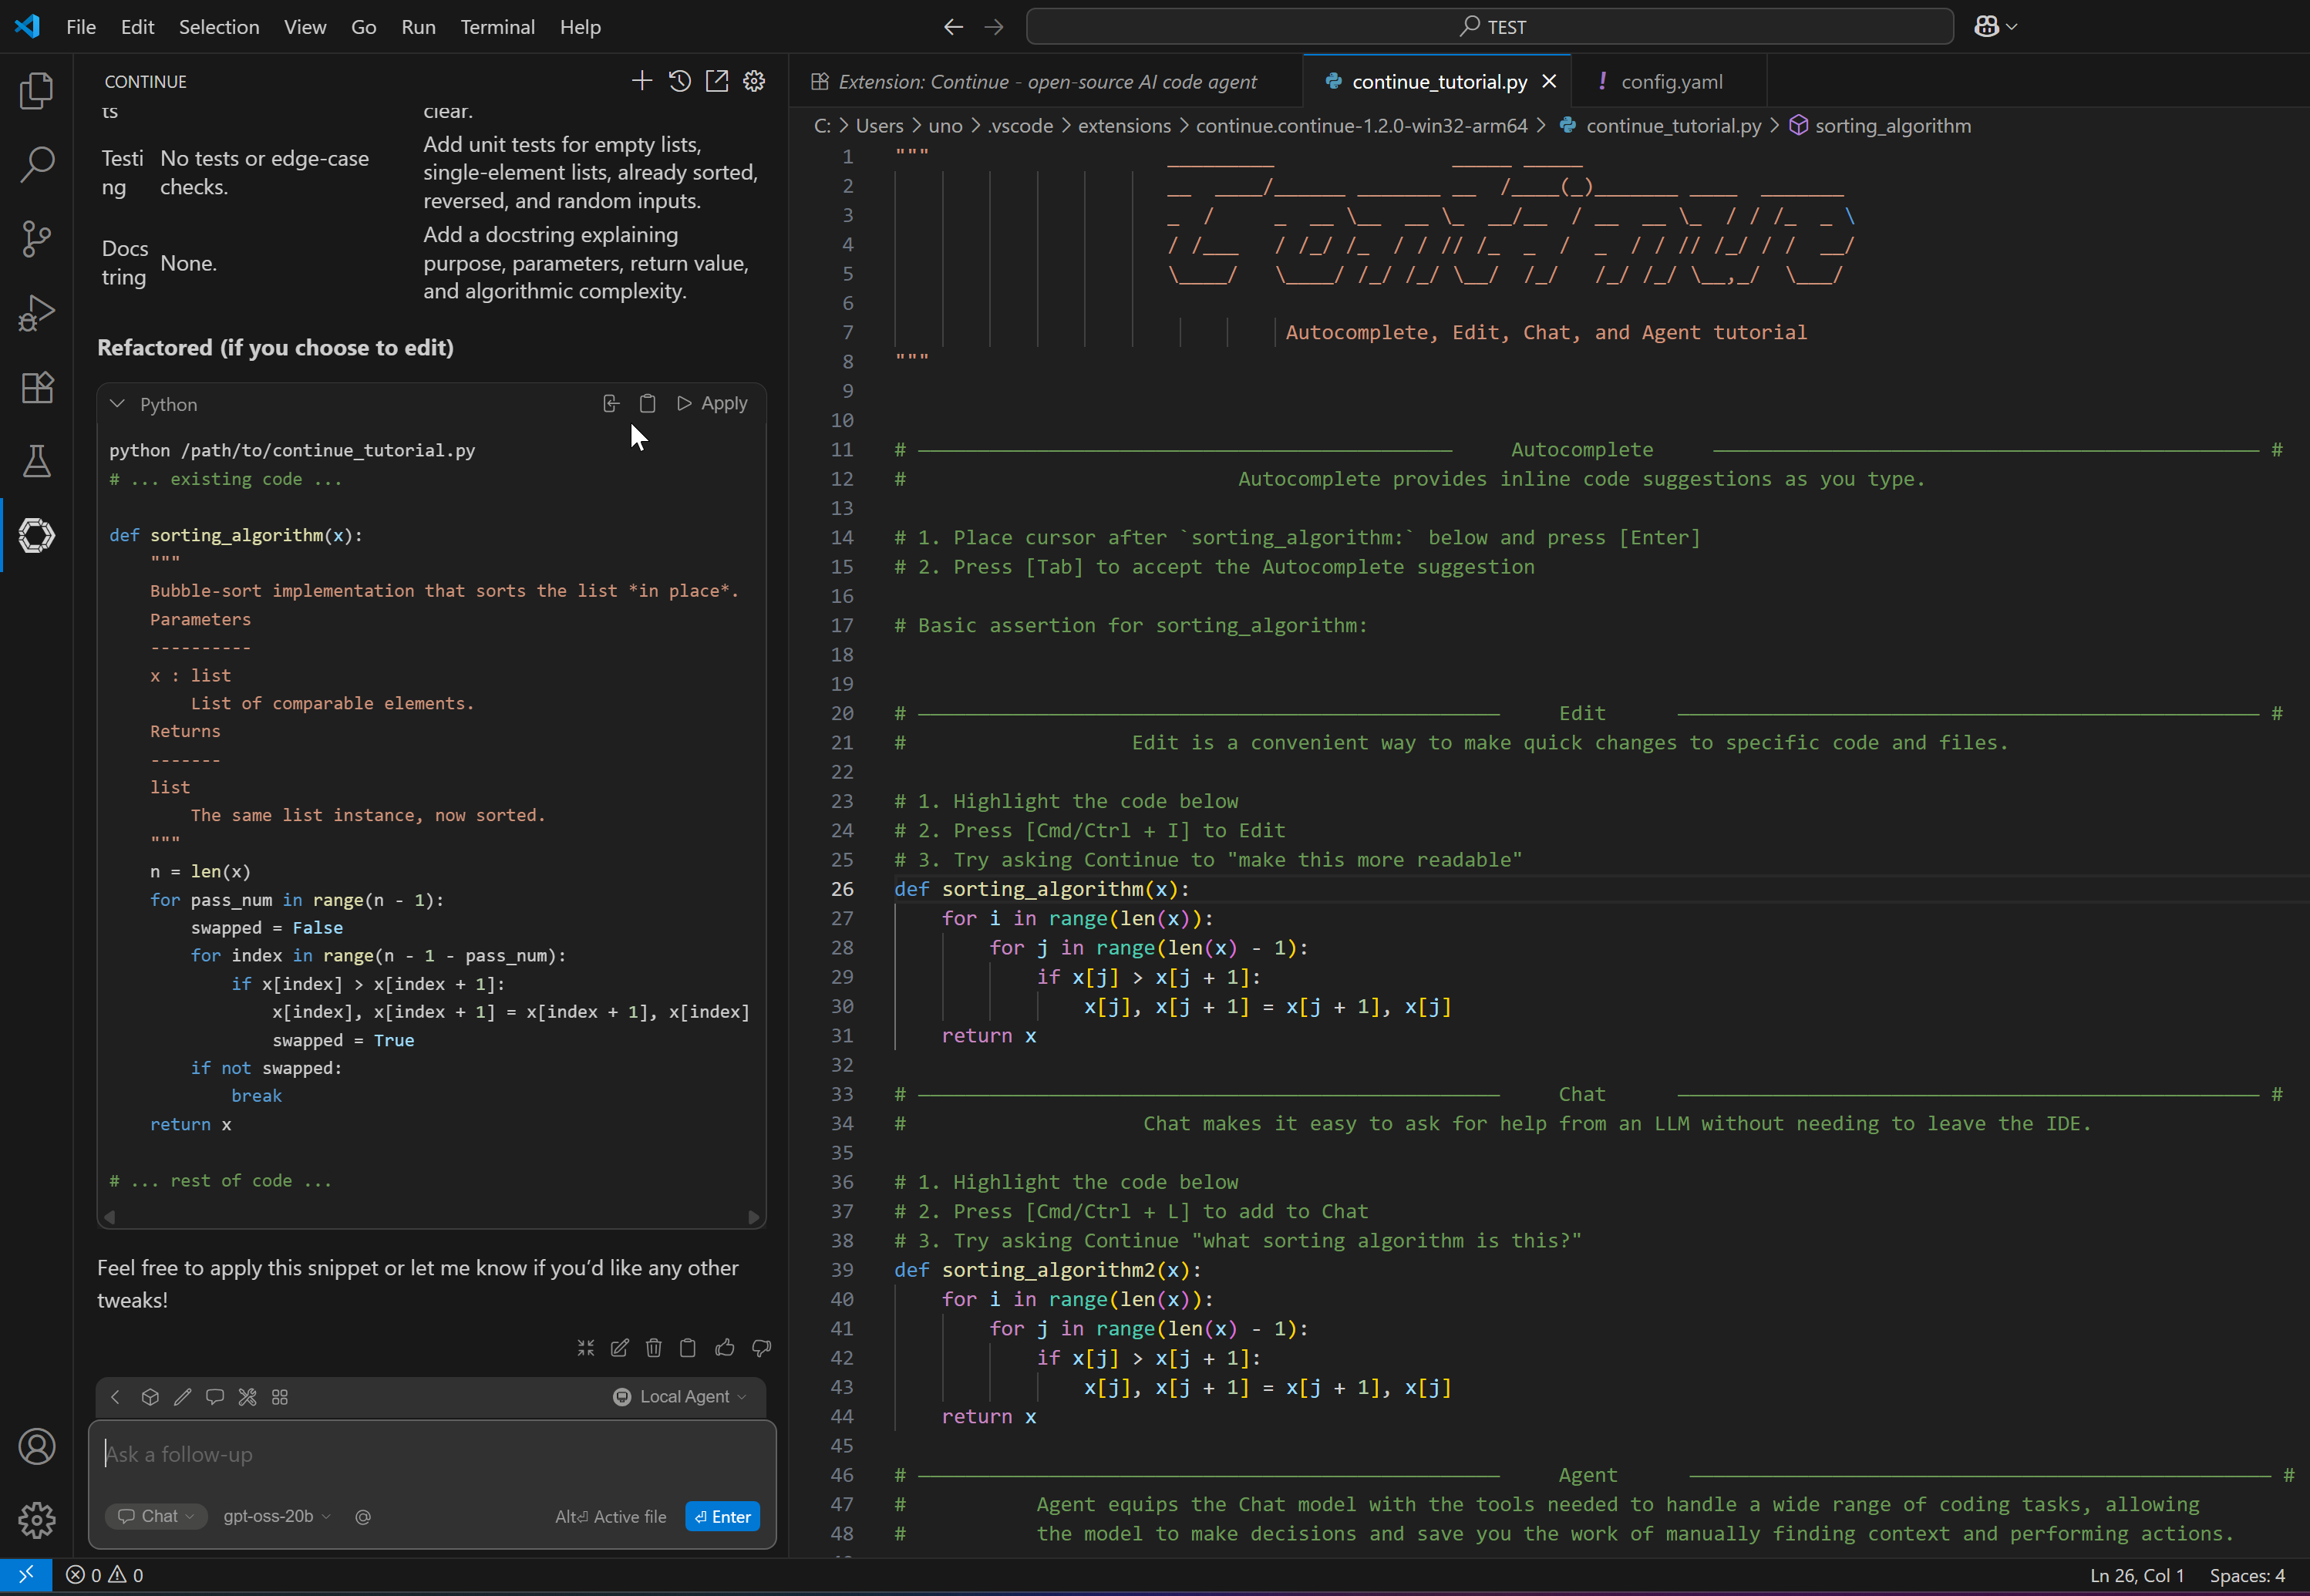
15. Install & Configure Continue on VS Code
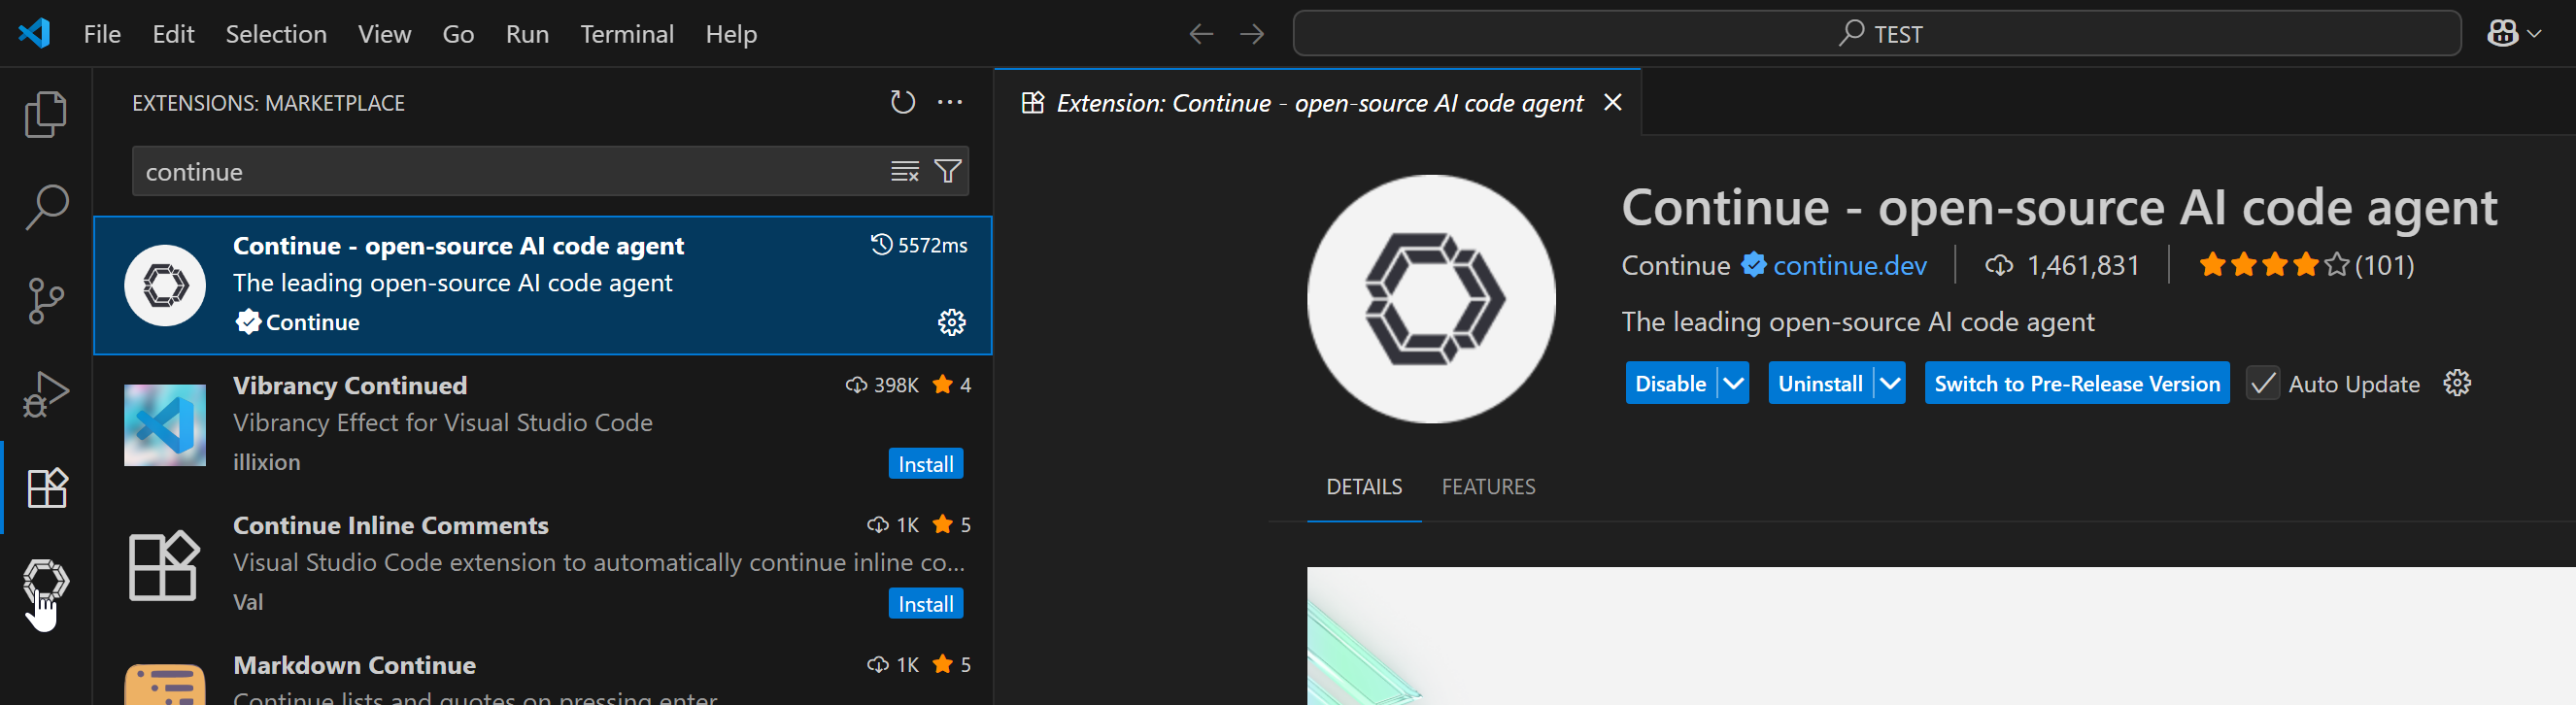
Open VS Code and install Continue as shown in the image.

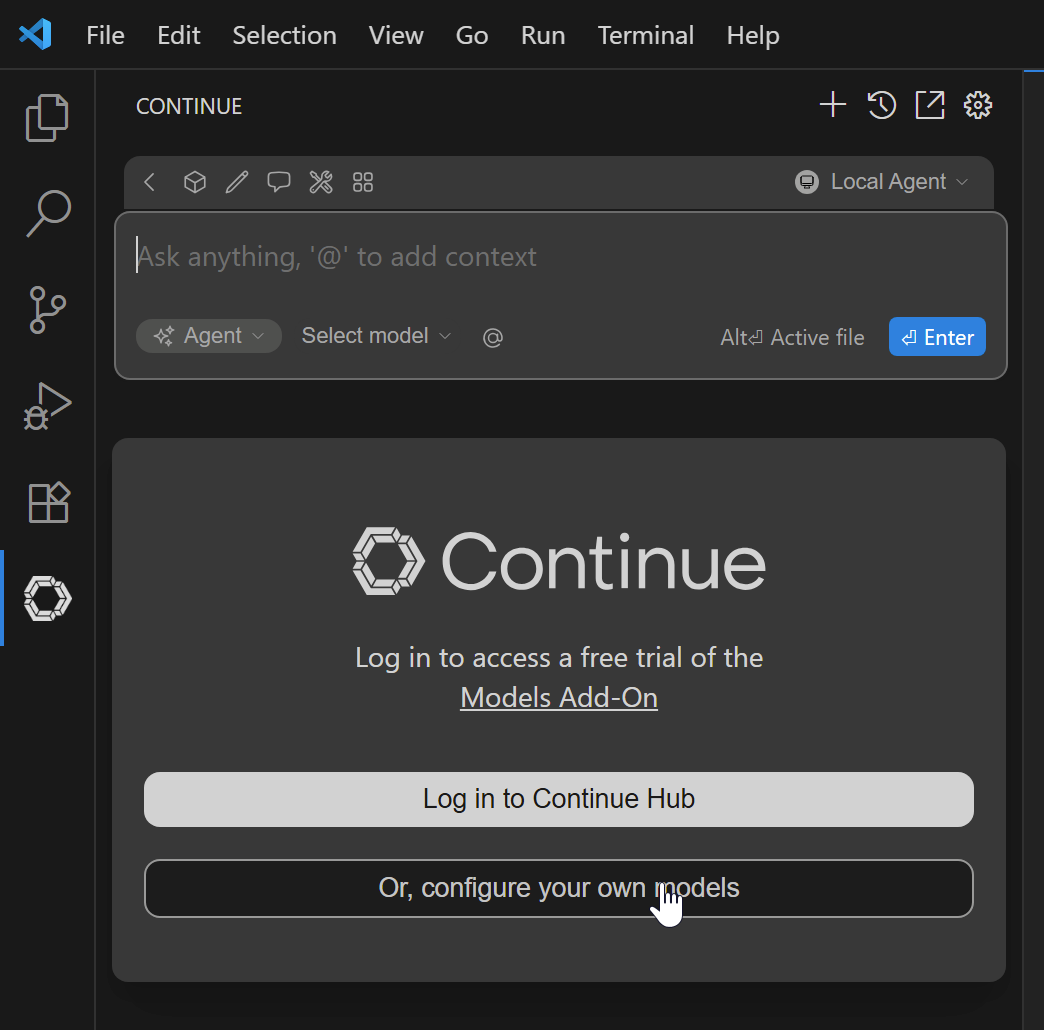
Once installed, click to open it:
Then click Configure your own models:
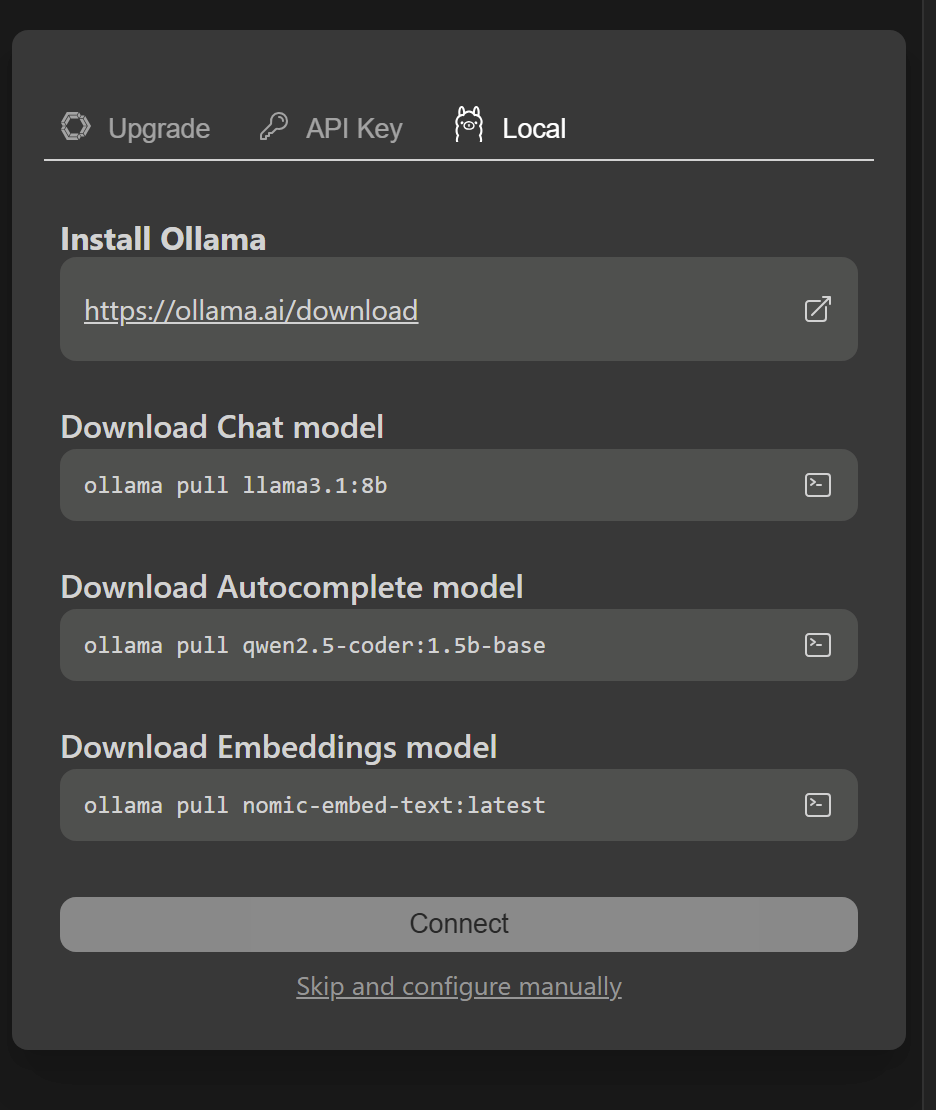
Choose Local and Skip and configure manually:
You’ll see a default config proposal:
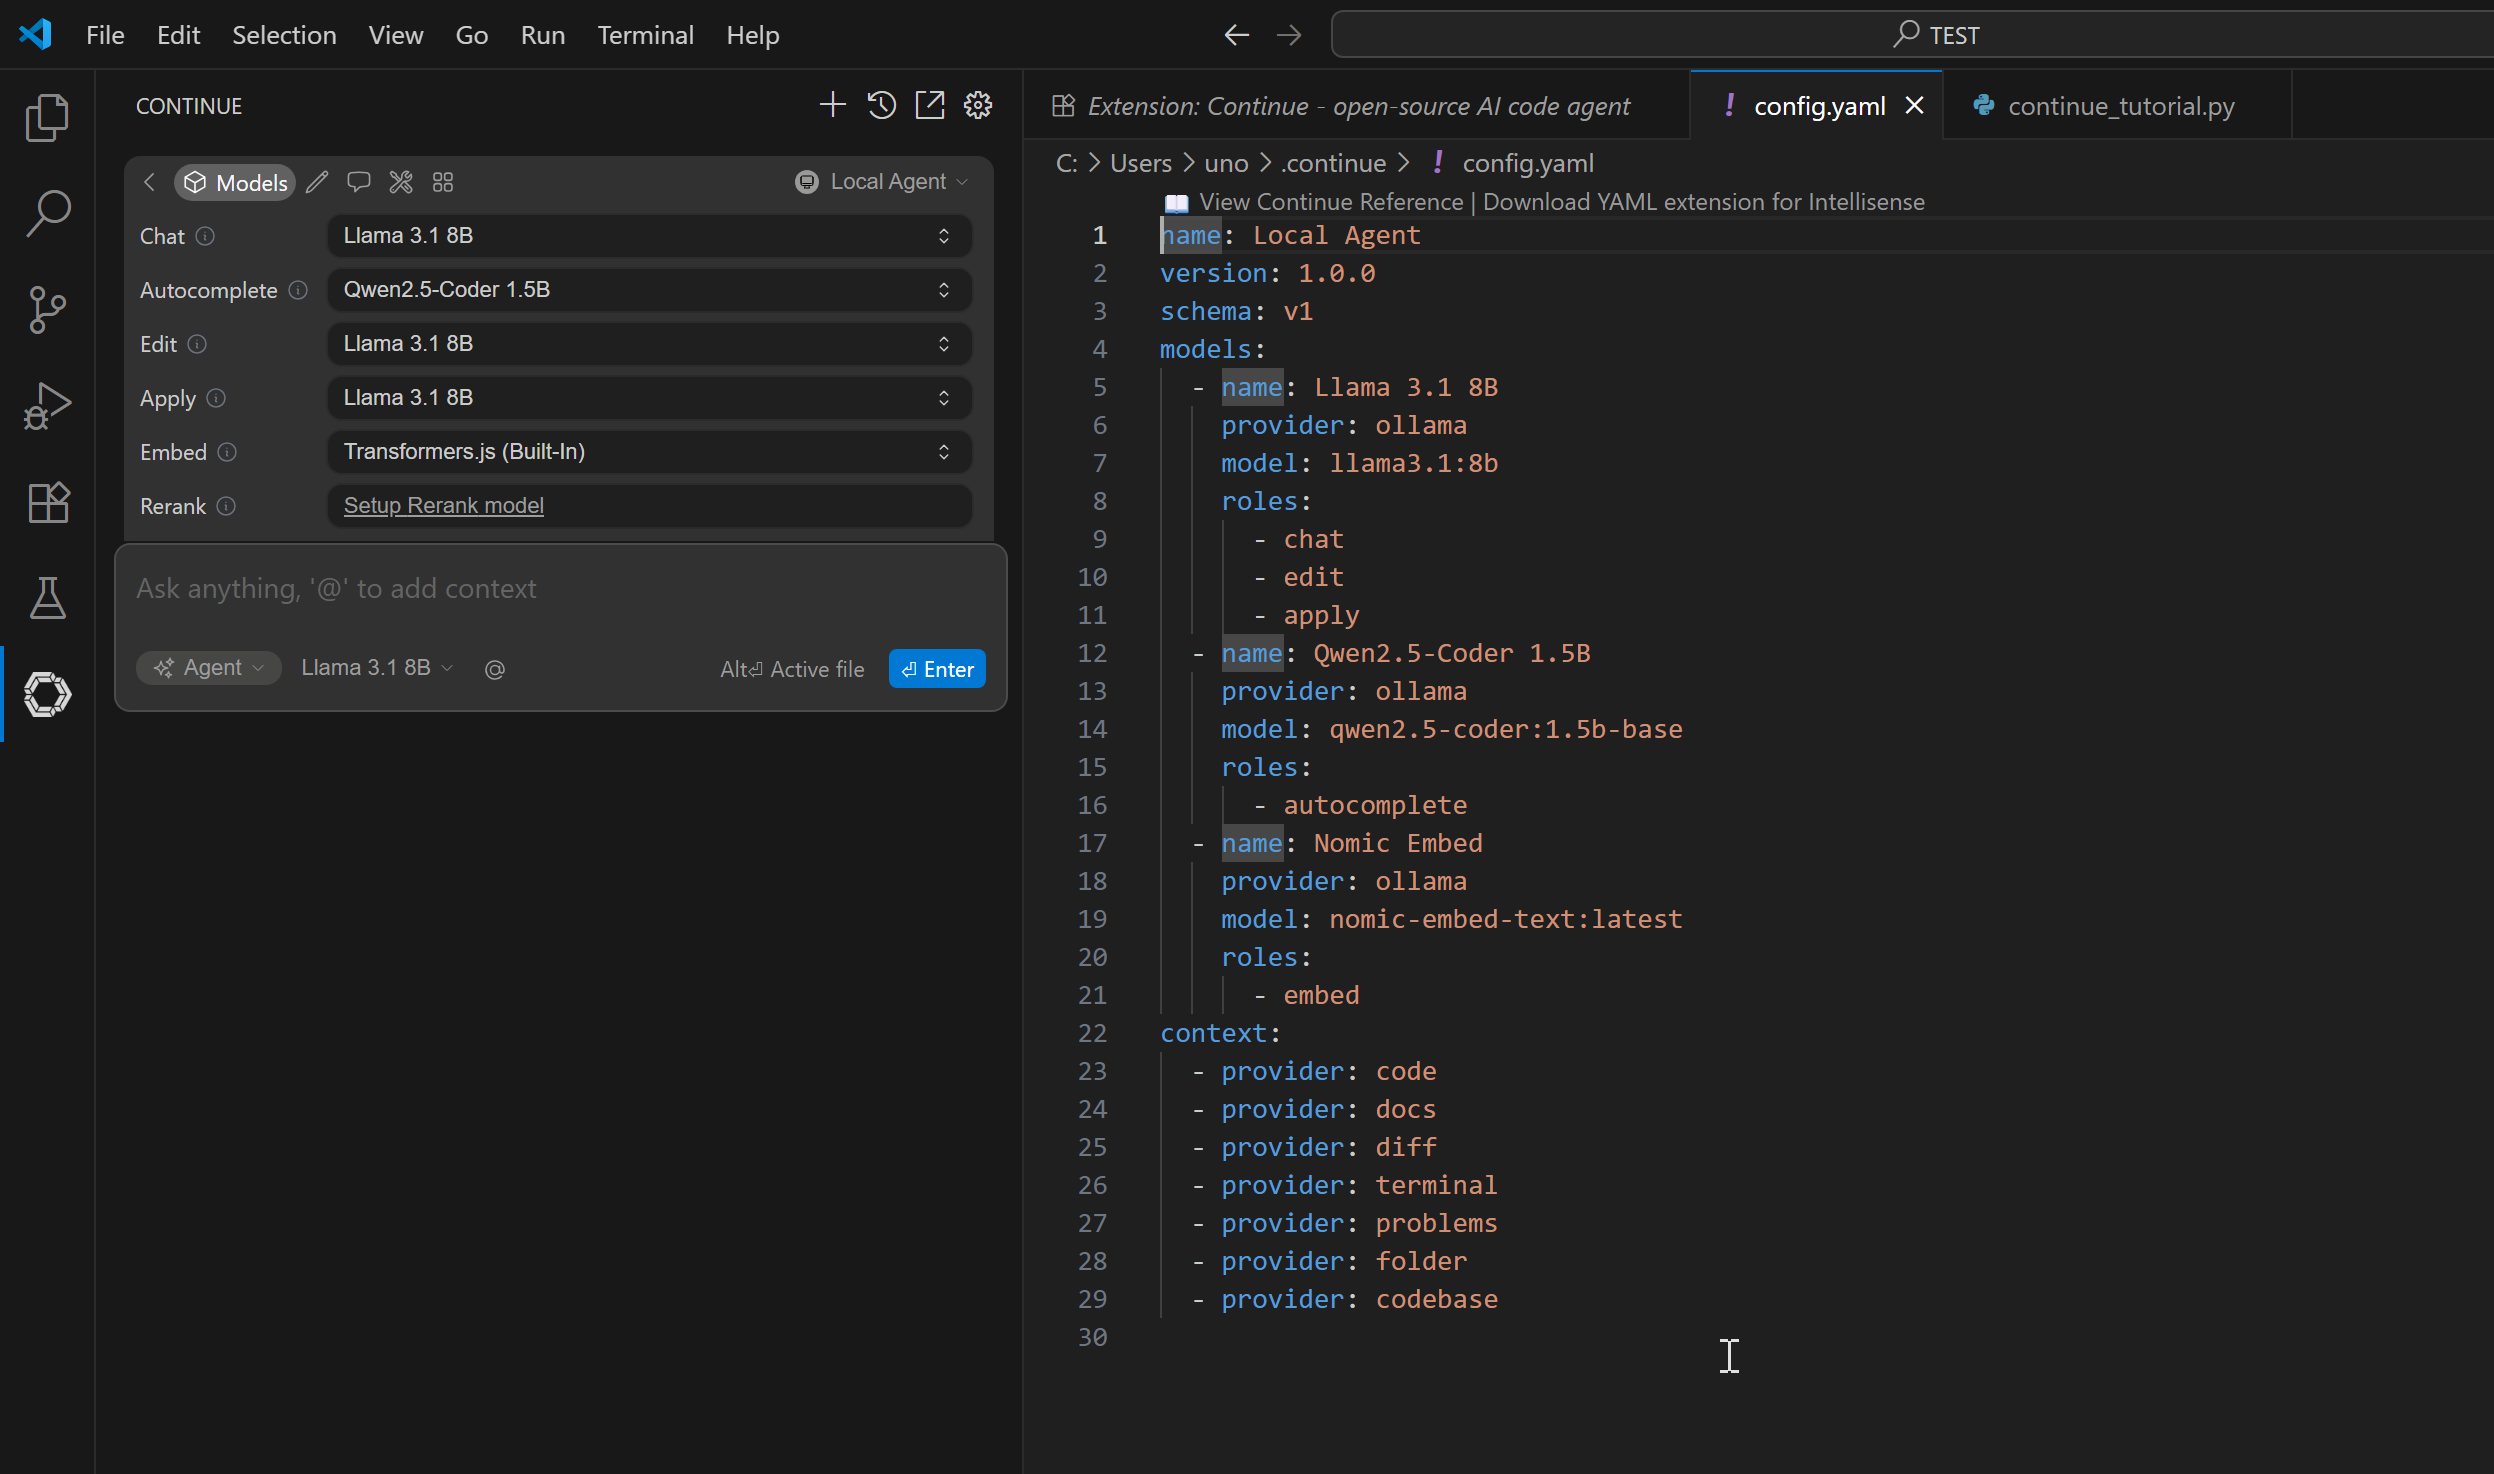
Replace it with this (customize with your server name and API key):
name: Local Agent
version: 1.0.0
schema: v1
models:
  - name: gpt-oss-20b
    provider: openai
    model: gpt-oss-20b
    apiBase: https://ada-ia-temp.moja-test.com/v1
    apiKey: sk-F4HBNzdzB_EdVvxkmufTIQ
    roles:
      - chat
      - edit
      - autocomplete
      - apply
      - summarize
  - name: qwen2.5-coder 1.5b
    provider: openai
    model: qwen2.5-coder-1.5b
    apiBase: https://ada-ia-temp.moja-test.com/v1
    apiKey: sk-F4HBNzdzB_EdVvxkmufTIQ
    roles:
    - autocomplete
  - name: dengcao/Qwen3-Reranker-8B:Q3_K_M
    provider: openai
    model: qwen3-reranker-8b
    apiBase: https://ada-ia-temp.moja-test.com/v1
    apiKey: sk-F4HBNzdzB_EdVvxkmufTIQ
    roles:
    - rerank
  - name: nomic-embed-text
    provider: openai
    model: nomic-embed-text
    apiBase: https://ada-ia-temp.moja-test.com/v1
    apiKey: sk-F4HBNzdzB_EdVvxkmufTIQ
    roles:
    - embed
context:
  - provider: code
  - provider: docs
  - provider: diff
  - provider: terminal
  - provider: problems
  - provider: folder
  - provider: codebase
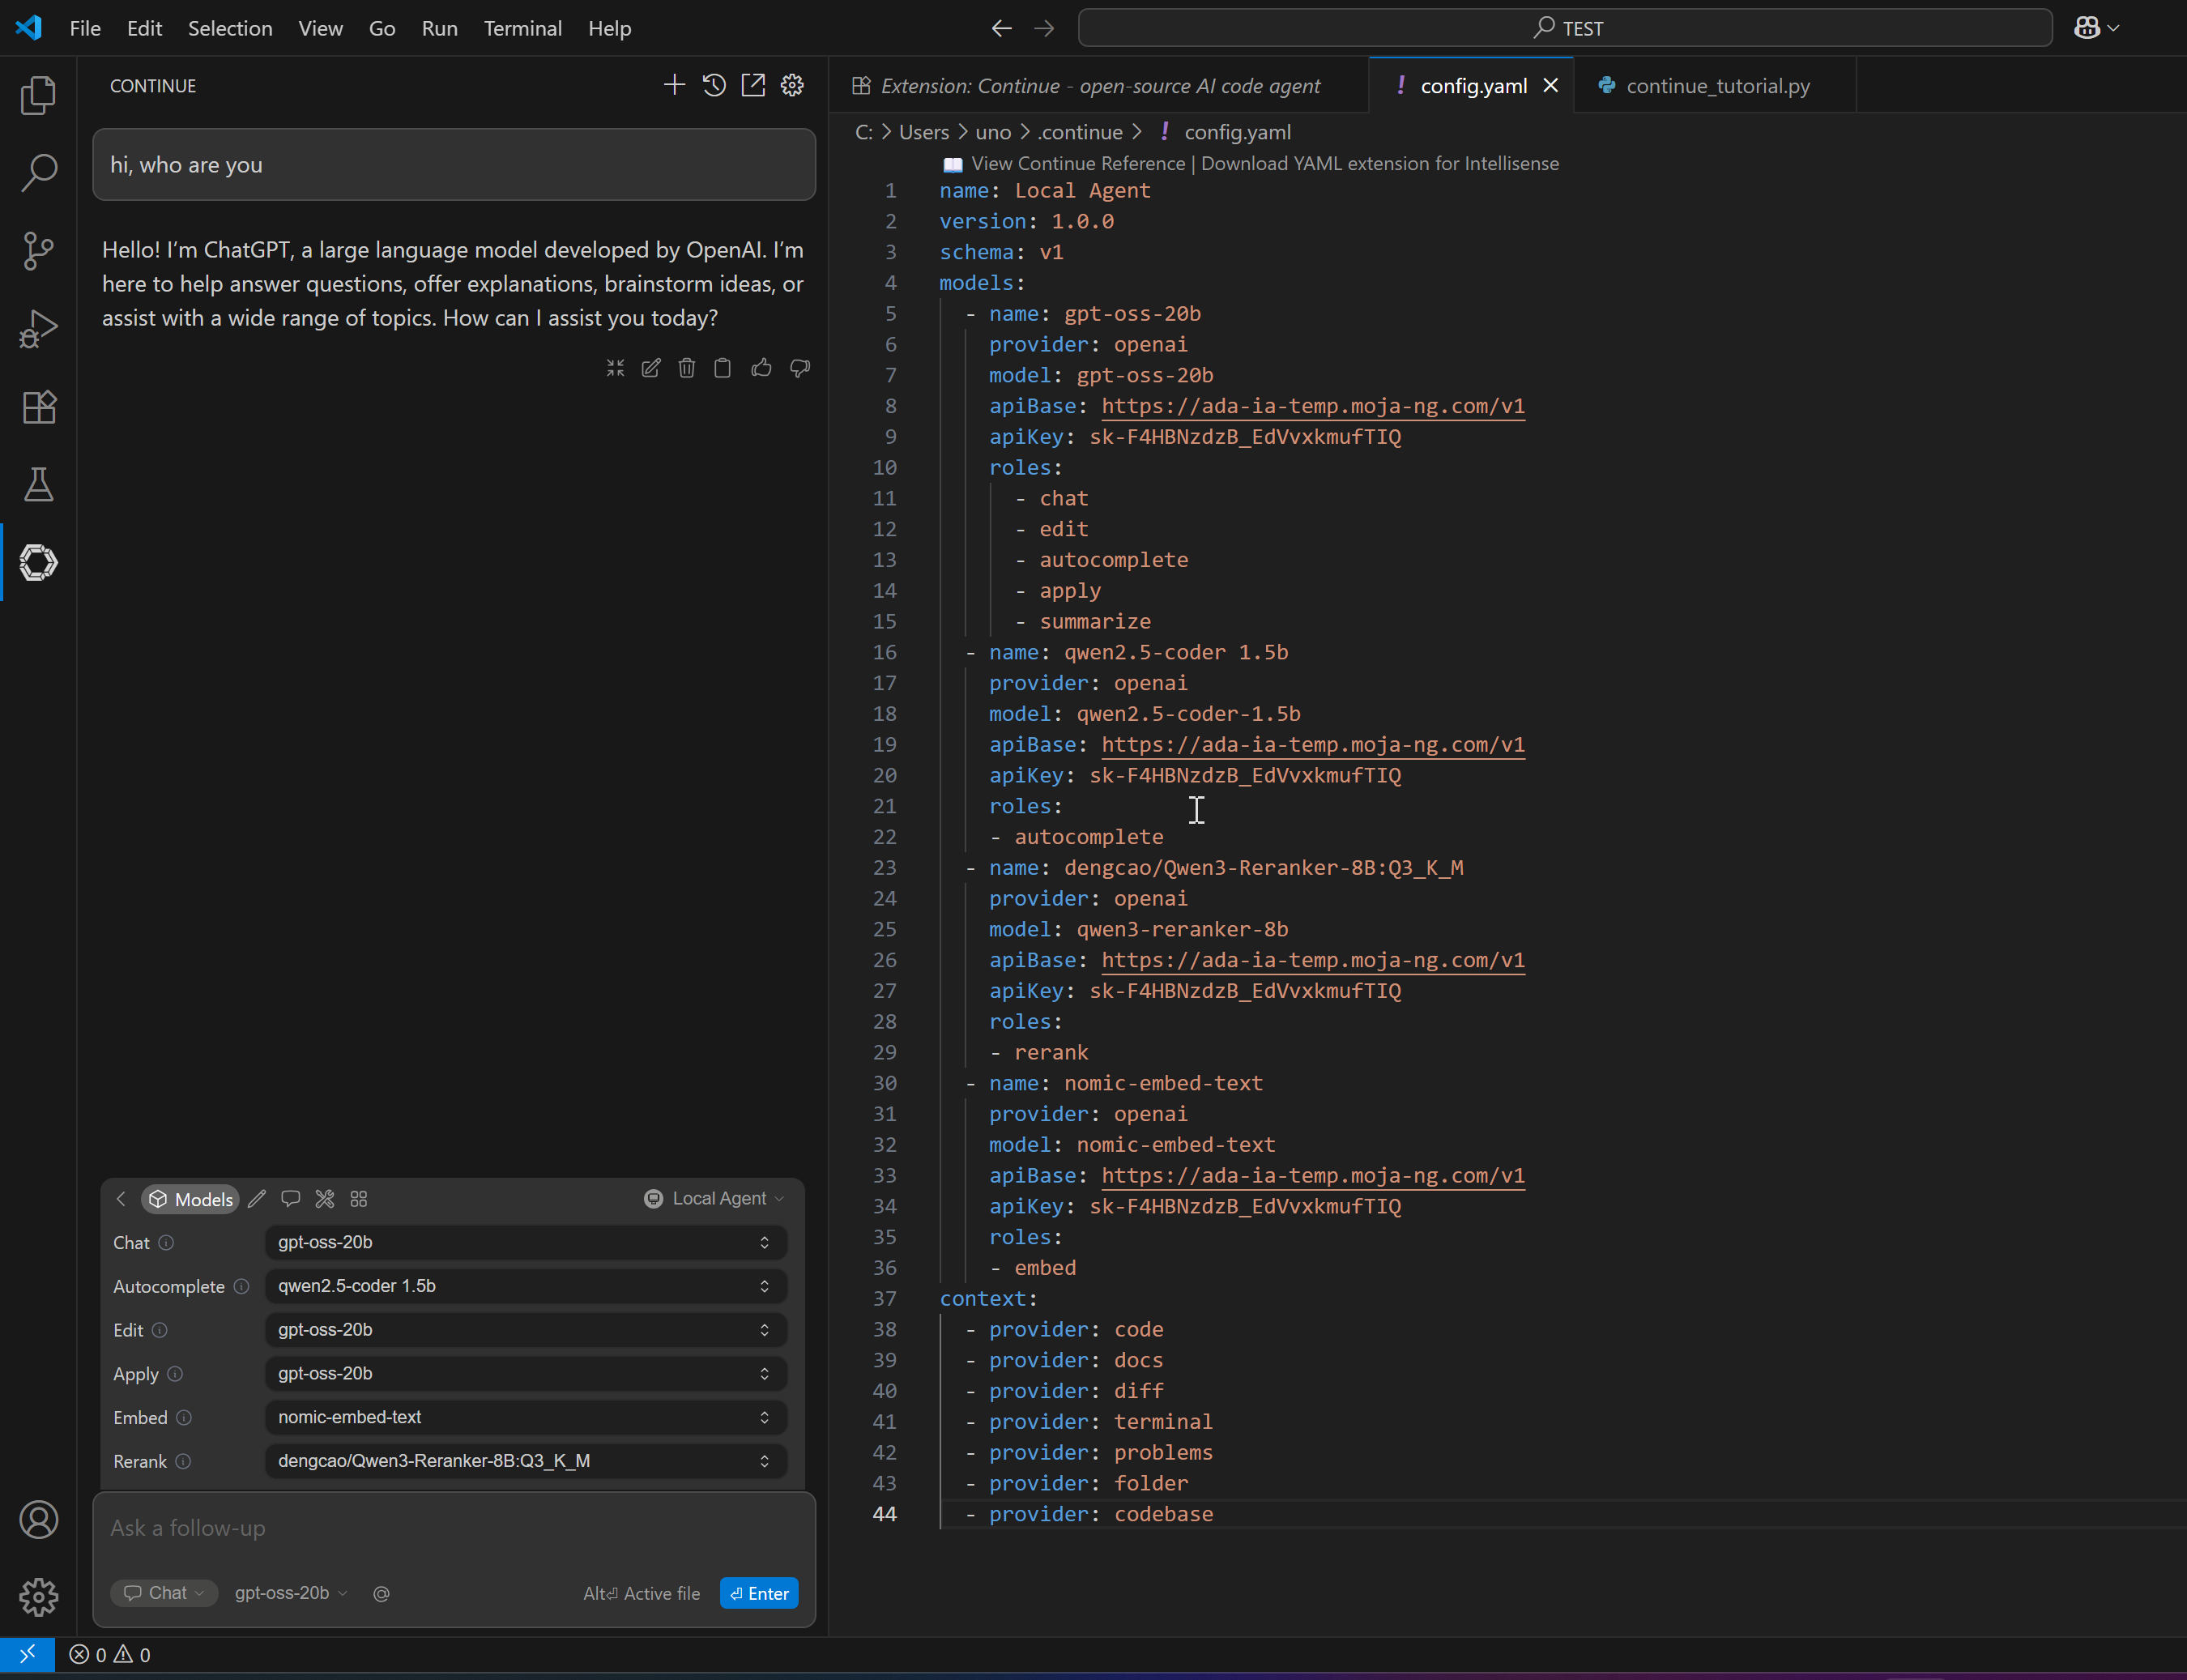
Configure the models as shown above and… have fun!
16. Conclusion
If you’ve made it this far—well done! It was a technical, detail‑rich journey, but the outcome is a powerful, secure AI infrastructure fully under your control.
You’ve built much more than a simple model host: you’ve assembled a complete AI hub, starting from a GPU‑backed VM and orchestrating components like Ollama (model management), LiteLLM (unified API + key management), and Nginx (secure HTTPS reverse proxy). All of this, neatly integrated in your day‑to‑day development workflow with Continue.dev.
Why Bother When APIs are Easy?
While getting an API key from Google or OpenAI is faster, it comes with trade-offs. A self-hosted solution is for those who have—or need to have—serious privacy concerns, or for those who want a powerful environment to experiment and learn. The core benefits are clear:
Your data remains yours. All prompts and responses stay on your server, ensuring total confidentiality. You also gain complete flexibility to test any open-weight model you want, breaking free from the curated lists of commercial providers.
What’s Next?
This server is your launchpad. From here, you can explore new models (released almost daily), dive deeper into LiteLLM’s advanced features like routing/fallbacks, or integrate your API into other tools and scripts.
The open‑source AI world is moving fast—and now you have the perfect setup to be part of it.
Enjoy, and happy coding!
Disclaimer: At MojaLab, we aim to provide accurate and useful content, but hey, we’re human (well, mostly)! If you spot an error, have questions, or think something could be improved, feel free to reach out—we’d love to hear from you. Use the tutorials and tips here with care, and always test in a safe environment. Happy learning!!!
No AI was mistreated in the making of this tutorial—every LLM was used with the respect it deserves.
Built with ❤️ by the MojaLab team.